
 Buy with Prime


Tackling the appearance of age spots naturally is all about understanding where they come from and being incredibly consistent with gentle, smart skincare. It's a journey that combines the power of botanical ingredients with a protective daily routine. Patience is key here, as you're guiding your skin back to a more even, radiant look.
Getting to Know Age Spots and What Causes Them
Have you started seeing small, flat brown or tan marks pop up on your hands, face, or shoulders? Most people call them age spots, but their technical name is solar lentigines. And despite old nicknames like "liver spots," these have absolutely nothing to do with your liver's health.
They are, quite simply, a direct souvenir of your skin's time in the sun. Think of them as little clusters of melanin, the pigment that gives your skin its unique color. After years of exposure to ultraviolet (UV) light—either from the sun or tanning beds—the cells that produce this pigment can go into overdrive in certain areas. This creates a build-up of melanin, forming those distinct darkened patches we know as age spots.
Are They the Same as Freckles?
It's easy to mix up age spots and freckles, but they're very different. Freckles are usually genetic, show up when we're kids, and often fade a bit in the winter when we're not in the sun as much.
Age spots, however, tend to appear later in life, a direct result of sun exposure adding up over the years. They are incredibly common in adults over 50, but younger people who've spent a lot of time outdoors can get them too. Unlike freckles, age spots don't just fade on their own; they represent a more permanent change in your skin’s pigment. You can read more about what causes these marks on the Mayo Clinic's website.
Key Takeaway: Age spots aren't really a sign of aging itself. They're a sign of how much time your skin has spent unprotected in the sun. This is actually great news! It means you have the power to influence how they look and prevent more from appearing.
Really grasping this sun-centric cause is the first step. It shifts your focus from just addressing the spots to building a complete strategy that includes both targeted natural ingredients and, just as importantly, diligent sun protection.
Why the Sun is Public Enemy Number One for Pigmentation
Every time your skin is exposed to UV radiation without any protection, it kicks into defense mode. It starts producing more melanin to absorb those rays and shield your deeper skin layers from harm. This is what we see as a tan.
But after years and years of this cycle, melanin production can get a bit haywire, becoming uneven and clumping together in certain spots. That’s how solar lentigines are born. It’s no surprise they show up most often on the parts of our body that see the most daylight.
- Face: Your forehead, cheeks, and nose are always out in the open.
- Hands: The backs of our hands are so often forgotten when we're applying sunscreen.
- Shoulders and Upper Back: These areas catch a lot of sun, especially in warmer weather.
- Arms: Our forearms, in particular, get a ton of daily sun exposure.
This knowledge is empowering. When you recognize the direct link between UV light and pigmentation, you can start building a routine that truly supports your skin's health and helps you achieve that beautifully even tone you’re looking for. For a deeper dive, check out our guide on using effective products for discolored skin. Remember, a consistent approach is your best friend in the quest for a clearer, more radiant complexion.
Powerful Botanicals for Visibly Brighter Skin
When you're trying to figure out how to address the appearance of age spots naturally, turning to Mother Nature is one of the most powerful and gentle places to start. Certain plant-derived extracts are celebrated for their ability to promote a brighter, more even-toned complexion. Getting to know these ingredients is the first step in choosing—or even creating—formulas that are perfectly in sync with your skin's needs.
The journey to a more uniform skin tone really begins with understanding what causes age spots in the first place. This simple visual breaks down how sun exposure kicks off the process that leads to those pesky patches of pigmentation.
As you can see, UV rays from the sun prompt your skin to ramp up melanin production. Over time, this melanin can clump together in certain areas, forming the age spots we see on the surface. Now, let's dive into the botanicals that can help address the appearance of this pigmentation.
Bakuchiol: The Gentle Retinol Alternative
For years, retinol has been the go-to for skin renewal, but it can be notoriously harsh, especially for sensitive skin types. This is where Bakuchiol, an extract from the babchi plant, has become a total game-changer. It’s gained a huge following for offering similar-looking benefits—like diminishing the appearance of fine lines and discoloration—without the irritation that often comes with retinoids.
Bakuchiol works by supporting the skin's natural cell turnover. By gently encouraging the surface layer to renew itself, it helps newer, more evenly pigmented skin cells come to the forefront. It’s an excellent choice for anyone with reactive skin who still wants to tackle an uneven tone.
Licorice Root Extract for Soothing Brightness
If you're looking for one of the most effective botanicals for a visibly brighter complexion, look no further than Licorice Root Extract. This powerhouse contains a compound called glabridin, which is a superstar at helping maintain an even skin tone by influencing the enzymes involved in melanin production.
Beyond its brightening chops, licorice root is also well-known for its incredible soothing properties. This dual action makes it a fantastic ingredient for skin that's prone to redness or sensitivity but also shows signs of hyperpigmentation. To learn more about its benefits, you can explore our detailed guide on using licorice root for your skin.
Pro Tip: When you're scanning ingredient lists, look for Glycyrrhiza glabra. That's the scientific name for licorice root, and you'll often find it in serums and moisturizers specifically formulated for discoloration.
Vitamin C Sourced From Nature
Vitamin C is an absolute must-have antioxidant for radiant-looking skin. While ascorbic acid is the common synthetic form you see everywhere, nature provides some incredibly potent sources that are bursting with this vitamin.
Here's a quick look at some of the most popular plant-derived ingredients and how they support your skin.
Natural Actives for a More Even-Toned Appearance
| Ingredient | Primary Function | Best For | Found In |
|---|---|---|---|
| Kakadu Plum | Antioxidant protection and brightening | Morning routines, serums for environmental defense. | Serums, essences, and Vitamin C powders. |
| Rosehip Oil | Improves texture and tone | Night routines, nourishing dry or mature skin. | Facial oils, moisturizers, and treatment balms. |
| Licorice Root | Visibly brightens and soothes skin | Sensitive skin with redness and dark spots. | Serums, masks, and targeted spot treatments. |
| Bakuchiol | Gentle skin renewal | A retinol alternative for sensitive skin types. | Serums, night creams, and anti-aging treatments. |
As you can see, nature offers a rich toolkit for addressing uneven skin tone.
As a powerful antioxidant, Vitamin C is your skin's bodyguard, helping to defend it against the environmental stressors that can contribute to dark spots. Using it in your morning routine, right before sunscreen, gives your skin an extra layer of support for maintaining a clear, vibrant look.
By choosing products rich in these botanicals, you can build a routine that beautifully supports your goal of a more balanced and radiant complexion.
Crafting Your Own Natural Brightening Serum
For those who love a good DIY project, making your own serum is a rewarding and powerful way to address the appearance of age spots. The best part? You control exactly what goes in, hand-picking high-performance ingredients that are perfect for your skin's unique needs.
We'll walk through two of my favorite recipes: a simple, nourishing oil-based serum that’s perfect for beginners, and a more advanced water-based gel for when you're ready to level up your skincare game.
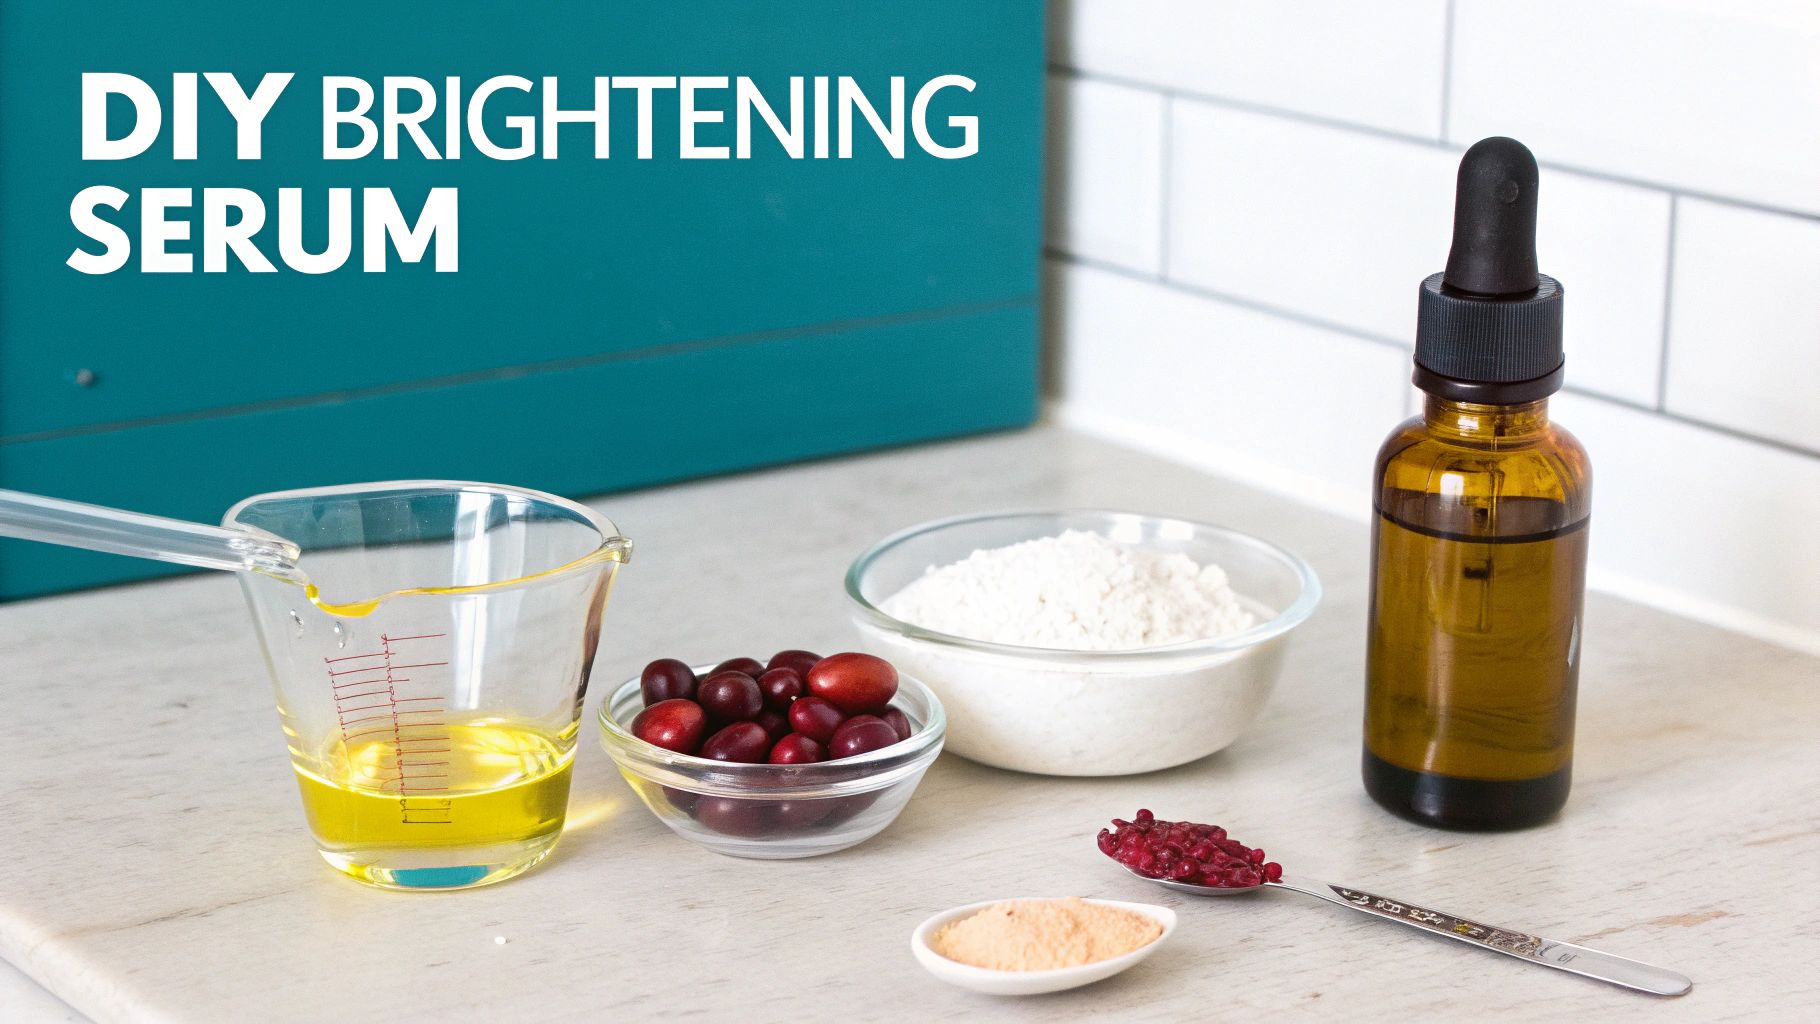
Beginner Recipe: Simple Radiance Oil Serum
An oil-based serum is the perfect place to start your DIY journey. They're incredibly simple to make, don't require complicated preservatives, and feel wonderfully nourishing on the skin. This recipe heroes carrier oils known for their ability to promote a more even, radiant skin tone.
What You'll Need:
- 1 oz (30 ml) Dark Glass Dropper Bottle: This is a must! It protects your precious oils from light, which can cause them to break down faster.
- Small Funnel: To make transferring the oils mess-free.
- Rosehip Seed Oil (15 ml): A true skincare classic, fantastic for improving the appearance of skin texture and tone.
- Jojoba Oil (10 ml): This lightweight oil is a crowd-pleaser because its structure is so similar to our skin's natural sebum, making it great for most skin types.
- Sea Buckthorn Berry Oil (5 ml): Don't be surprised by its vibrant color! This oil is an antioxidant powerhouse that gives your skin an incredible glow.
Putting It Together:
First, carefully measure out each oil. Using your small funnel, pour them one by one into the dark glass dropper bottle.
Once all the oils are in, screw the cap on tightly and gently roll the bottle between your palms for about a minute. This mixes everything together beautifully without introducing a bunch of air bubbles, which can happen if you shake it.
Store your finished serum in a cool, dark place, like a medicine cabinet, to keep the oils fresh and potent.
Expert Tip: Before you go all-in, always do a patch test. Apply a tiny amount to a discreet spot, like behind your ear or on your inner wrist. Wait 24-48 hours to make sure your skin is happy with the new blend before using it on your face.
Advanced Recipe: Brightening Gel Serum
Once you’ve mastered oil blends, you might be curious about water-based serums. These formulas open up a whole new world of powerful, water-soluble active ingredients that can deliver incredibly targeted results. Since they contain water, a preservative is essential to keep them safe and free from nasty bacteria.
This recipe features some real superstars for promoting a bright, even complexion. You can find high-performance actives like Niacinamide and Alpha Arbutin at specialty suppliers, which means you can create formulas at home that rival the pros.
Ingredients & Measurements:
| Ingredient | Purpose | Amount (for 30g batch) |
|---|---|---|
| Distilled Water | Serum Base | 23.4 g |
| Niacinamide (Vitamin B3) | Visibly Brightens Tone | 1.5 g |
| Alpha Arbutin | Reduces Appearance of Dark Spots | 0.6 g |
| Glycerin | Humectant (Hydrator) | 1.5 g |
| Xanthan Gum | Thickener | 0.3 g |
| Leucidal SF Complete | Natural Preservative | 1.2 g |
| Lactic Acid (88%) | pH Adjuster | 1-2 drops (as needed) |
Step-by-Step Formulation Guide
Making a water-based serum is a bit more precise, but the process is very straightforward once you get the hang of it.
Phase 1: The Water Phase
In a sanitized beaker, combine the distilled water and Niacinamide. Give it a gentle stir until the powder has completely dissolved.
Next, add the Alpha Arbutin powder. This one can be a little stubborn, so be patient and keep stirring until it’s fully dissolved. If you're interested in adding other powerful powders, you can learn more about using Ascorbic Acid powder for skin in our detailed guide.
Phase 2: The Thickening Phase
In a separate small dish, mix the Glycerin and Xanthan Gum together until they form a smooth slurry. This is a critical step! It prevents the Xanthan Gum from clumping up when you add it to your water mixture.
Slowly pour the glycerin-xanthan slurry into your water phase, stirring the whole time. You’ll see the mixture start to thicken up into a lovely gel consistency.
Phase 3: The Final Touches
Once your serum has a smooth, uniform texture, it's time to add the Leucidal SF Complete preservative. Stir it in well to make sure it's evenly distributed.
Now, check the pH using pH strips. You're aiming for a skin-friendly range between 4.5 and 5.5. If the pH is a bit high, add one drop of Lactic Acid, stir, and test again. Repeat until you hit that target range.
Finally, carefully transfer your beautiful new serum into a sanitized airless pump or dropper bottle. Don't forget to label it with the name and the date you made it! It’s best used within 3-4 months.
Building Your Daily Hyperpigmentation Routine
When your goal is improving the appearance of age spots and evening out your skin tone, consistency isn't just important—it's everything. Think of your skincare not as a chore, but as a dedicated daily ritual. This isn't about slapping on a bunch of products; it's a strategic, two-pronged approach that works with your skin's natural rhythm.
Your morning routine is all about protection. It’s your shield against the very things that cause hyperpigmentation in the first place, mainly the sun. Then, your evening routine is for renewal, delivering those potent, spot-targeting ingredients while your skin is in its natural regenerative state.
Your Morning Protection Ritual
Mornings should be simple and focused. The main job is to defend your skin from the day's environmental onslaught. You don’t need a complicated, 10-step process here. In fact, you really only need to zero in on two non-negotiable elements: antioxidants and sun protection.
-
Lead with an Antioxidant Serum: Right after cleansing, your very first step should be a serum packed with antioxidants. This is where ingredients like Vitamin C (from sources like Kakadu Plum) really shine. They act as a backup crew for your sunscreen, helping to neutralize the free radical damage from UV rays and pollution that contributes to an uneven complexion. Apply a few drops to your face, neck, and the backs of your hands—these are the spots that see the most sun and are most prone to age spots.
-
Finish with Broad-Spectrum Sunscreen: I can't stress this enough: this is the most critical step if you want to improve the look of age spots naturally. Without daily sun protection, all your other efforts will be for nothing. New sun exposure will simply create new spots and darken the ones you're trying to fade the appearance of. Look for a broad-spectrum sunscreen with an SPF of 30 or higher, and don't be shy when you apply it.
Real-World Tip: Don't forget to reapply your sunscreen every two hours if you're outdoors for a while, sweating, or after you've been swimming. If you're mostly inside at a desk, a generous morning application is a solid start. For bonus points, keep a powder or spray sunscreen handy for a quick touch-up over your makeup midday.
Your Evening Renewal Sequence
Nighttime is when the magic really happens. Your skin kicks into repair mode while you sleep, which makes it the absolute best time to apply your most powerful, targeted ingredients. This is when your DIY brightening serum gets to work, undisturbed by sunlight. The trick is to layer your products correctly so each one can do its job effectively.
The golden rule of layering is simple: go from the thinnest consistency to the thickest. This ensures everything can actually absorb into your skin.
-
Step 1: Cleanse Thoroughly: Always, always start with a clean face. A gentle cleanser will wash away the day's makeup, sunscreen, and grime without stripping your skin's protective moisture barrier.
-
Step 2: Apply Your Treatment Serum: Now it’s time for your heavy hitter—the DIY Brightening Gel Serum or your Radiance Oil. Gently pat a thin layer onto your face, neck, and chest. Give it a minute or two to sink in completely before you move on.
-
Step 3: Moisturize: A good moisturizer is more than just a hydrator. It creates a seal, locking in the active ingredients from your serum and supporting your skin's barrier. Pick a moisturizer that works for your skin type, whether it's a light lotion or a richer cream.
Product Layering Best Practices
Knowing how to layer is just as crucial as the ingredients you choose. If you apply your products in the wrong order, you can make them less effective or even cause irritation. It's a common mistake!
For instance, if you slather on a thick, oil-based cream before your lightweight, water-based serum, that oil will form a barrier. The serum's ingredients just won't be able to get through to do their work. This is exactly why your water-based serums (like the advanced DIY recipe) should always go on first, right after cleansing.
If you're using an oil-based serum (like the beginner recipe), you have a bit more flexibility. It can go on right before your moisturizer, or you can even mix a few drops into your moisturizer for an extra nourishing kick. Just stick to that simple "thinnest-to-thickest" rule, and you'll give every product in your routine the best possible chance to work for your skin.
Sun Protection: Your Non-Negotiable First Step
Let’s be crystal clear about something: no botanical serum or brightening cream in the world will make a lasting difference if you aren't absolutely diligent about sun protection. It's the foundation of everything. Think of your targeted skincare as the skilled players, but sunscreen is the entire field they play on. Without it, you’re just not in the game.
This is the single most important part of your skincare routine, both for preventing new spots from showing up and for helping improve the appearance of the ones you already see.
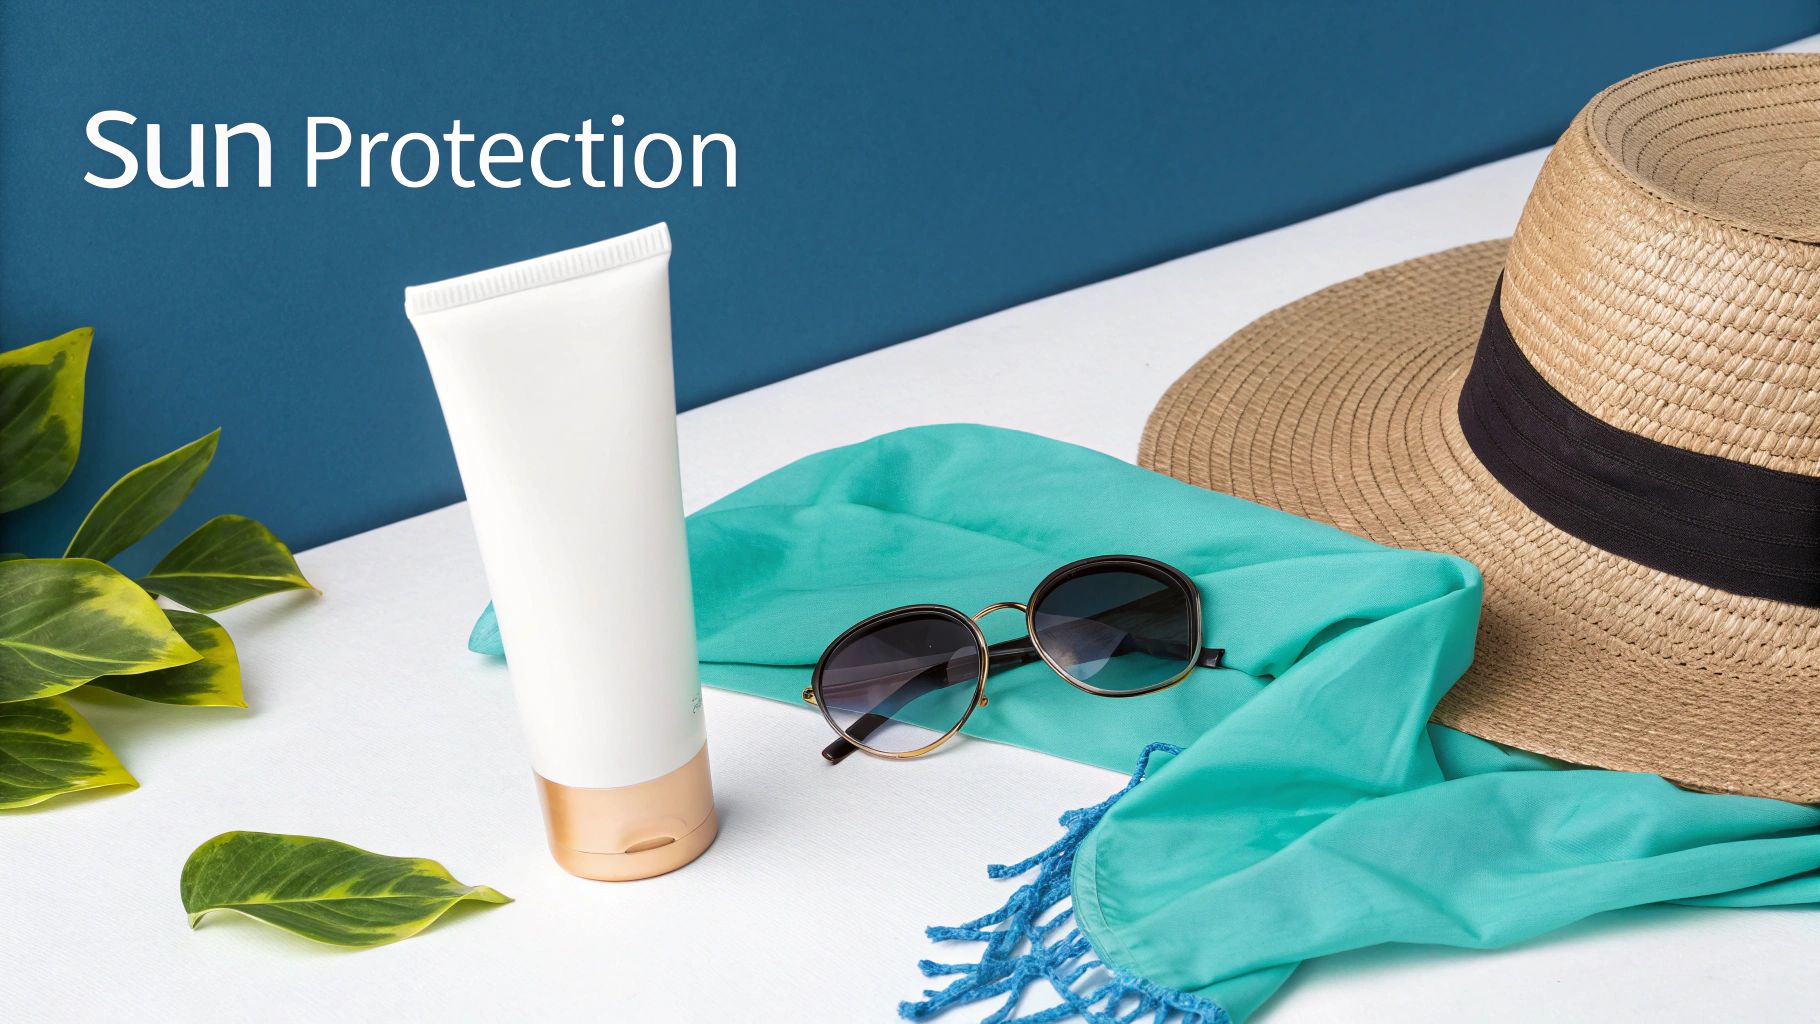
Honestly, if you skip daily sun protection, you're taking two steps forward with your brightening routine only to take three steps back every single time you step outside. The sun's UV rays are the main culprit behind that overproduction of melanin, so shielding your skin is non-negotiable.
Mineral vs. Chemical: What's the Difference?
The sunscreen aisle can feel overwhelming, but it really boils down to two main players: mineral and chemical. There’s no single "best" option—it's all about finding the one that feels great on your skin, works with your lifestyle, and that you'll actually commit to using every single day.
-
Mineral Sunscreens: You might hear these called physical blockers. They work by sitting on top of the skin and using ingredients like zinc oxide and titanium dioxide to physically bounce UV rays away. If you have sensitive or reactive skin, mineral formulas are often your best friend because they are incredibly gentle.
-
Chemical Sunscreens: These formulas use active ingredients like avobenzone and octisalate that work in a totally different way. They absorb UV radiation, turn it into heat, and then release it from the skin. Chemical sunscreens often feel lighter and sink into the skin without that classic white cast, making them a go-to choice for daily wear, especially under makeup.
Understanding the direct line between sun exposure and skin health is a global conversation. The worldwide burden of skin cancer varies dramatically by region. For instance, rates of melanoma are highest in Australasia, followed by North America and parts of Europe, which really highlights how much our environment impacts skin health and why prevention is so critical. You can learn more about these global skin health statistics on jamanetwork.com.
Sun-Smart Habits That Go Beyond the Bottle
Just slathering on some sunscreen in the morning is a fantastic start, but true sun safety is more of a lifestyle. A few simple, consistent habits can make a huge impact on preventing future hyperpigmentation.
Key Takeaway: Stop thinking of daily sun protection as just another skincare step. It's a fundamental practice for your skin’s long-term health and vibrance. It is your absolute number-one strategy in the journey to a more even-toned appearance.
The most effective plan is a layered one. It’s about being mindful of your time in the sun and using all the tools you have. For a deep dive into finding the perfect product for your skin, take a look at our guide on selecting the best sunscreen for summer.
Practical Tips for Everyday Protection
To really protect your skin and boost your brightening efforts, you need to turn these tips into second nature. These small daily actions are what stop new spots from forming while you’re working on the appearance of the old ones.
-
Use the Right Amount: This is a big one. Most people use way less sunscreen than they actually need. For your face and neck, a good rule of thumb is a nickel-sized amount. Skimping on the amount dramatically lowers the SPF protection you're getting.
-
Reapply, Reapply, Reapply: Sunscreen isn't a "set it and forget it" product. You need to reapply it at least every two hours when you're outside, and even more often if you've been swimming or sweating.
-
Don't Forget the Neglected Spots: We all do it—we focus on the face and forget other areas. The backs of your hands, your ears, your neck, and your chest are prime real estate for age spots. Get in the habit of covering them every single day.
-
Be Smart About Sun Exposure: Sunscreen is just one line of defense. Whenever you can, seek out shade during the sun’s peak hours (usually 10 a.m. to 4 p.m.). Make wide-brimmed hats and sunglasses your best friends—they offer crucial protection for your face and eyes.
Answering Your Top Questions About Fading Age Spots Naturally
Starting a new skincare routine to even out your complexion always brings up a few questions. It's totally normal to wonder about how long it will take, whether certain ingredients are safe, and what you can realistically expect. Getting those answers upfront helps you build the confidence to stick with it and see real results.
Let's get into some of the most common questions people have when they decide to address the appearance of age spots the natural way. My goal is to give you the practical knowledge you need to manage your routine and your expectations.
How Long Until I See a Difference?
This is the big one, right? The honest answer is: it depends. Age spots are the result of years of sun exposure, so improving their appearance isn't going to happen overnight. With a consistent, targeted routine that includes daily sun protection and powerful natural ingredients, you could start to see a subtle brightening in as little as 4 to 6 weeks.
But for more significant changes, patience is key. Most people see noticeable improvement after 3 to 6 months of dedicated use. Your skin type, how dark the spots are, and especially how diligent you are with sunscreen all play a huge part in your personal timeline.
Are Natural Ingredients Safe for Sensitive Skin?
Many people gravitate toward natural ingredients because they're seen as gentler, and that's often true. Botanicals like Licorice Root Extract and Bakuchiol are popular because they're effective but also have soothing properties, making them fantastic choices for sensitive or reactive skin.
That being said, "natural" doesn't automatically mean "allergy-proof." Just like with any new skincare product, doing a patch test is an absolute must.
How to Do a Patch Test: Dab a small amount of your new serum or cream on a discreet spot, like the inside of your wrist or just behind your ear. Wait at least 24 hours to see if any redness or irritation pops up before you apply it all over your face.
This simple step is the best way to make sure a new ingredient is going to be a good fit for your unique skin.
Can Age Spots Come Back?
Yes, they absolutely can. This is a really important thing to understand. Age spots are directly caused by sun exposure. Even after you've successfully improved their appearance, new UV exposure can easily wake up that pigment production, causing them to reappear or new ones to form.
This is exactly why sun protection isn't just one step in your routine—it's your long-term strategy for keeping your skin clear. Daily, consistent use of a broad-spectrum sunscreen is the single best thing you can do to prevent them from returning.
Age spots, clinically known as solar lentigines, are incredibly common signs of long-term sun damage. In fact, research estimates that they affect about 90% of people over the age of 70, making them almost universal in older populations. You can read more about these findings on solar lentigines prevalence. This just highlights why preventing new spots is just as critical as addressing the ones you have. For more ideas, be sure to check out our guide on natural remedies for dark spots.
At Skin Perfection, we provide the high-performance natural actives and DIY supplies you need to create personalized skincare that supports your journey to a beautifully even and radiant complexion. Explore our collection and start crafting your perfect formula today at https://www.naturalorganicskincare.com.