
 Buy with Prime


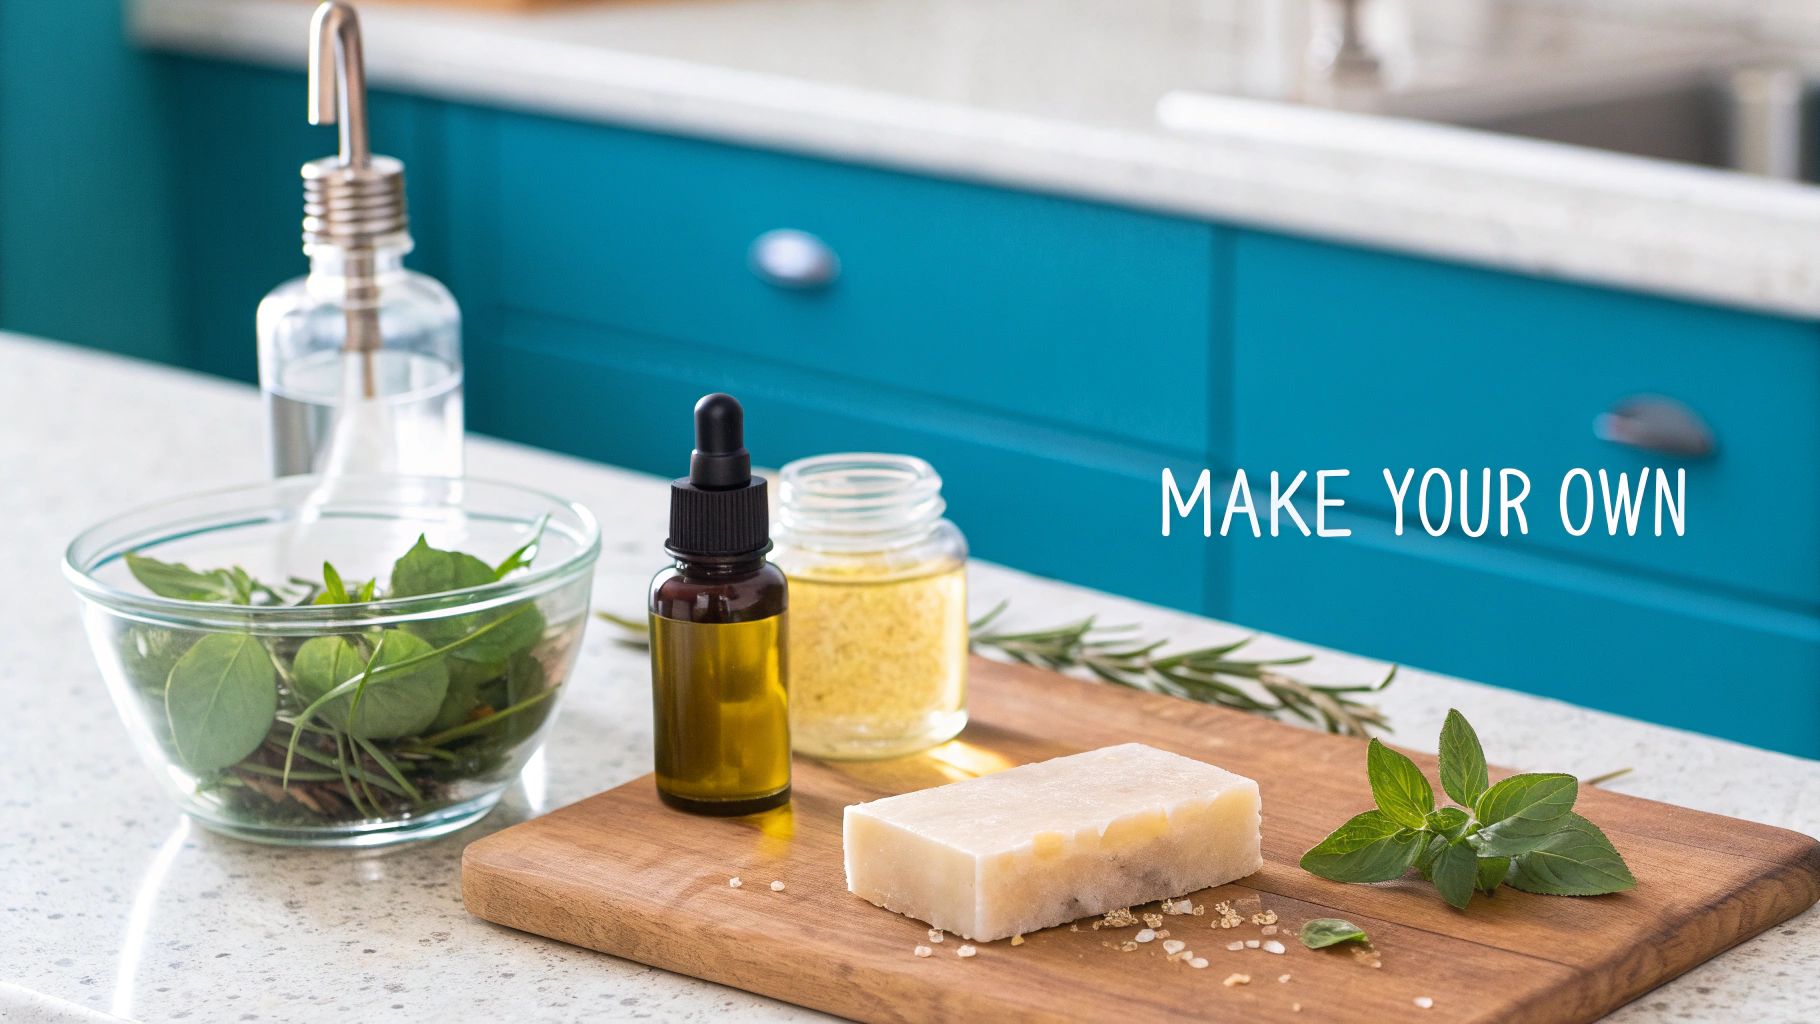
Making your own face cream is one of the most empowering things you can do for your skin. It puts you in the driver's seat, letting you hand-pick every single ingredient to create something that’s perfectly suited to you. Forget the one-size-fits-all approach of store-bought products; when you follow the right recipes for homemade face creams, you can craft something that feels truly luxurious and is tailored to your skin's appearance.
Why Create Your Own Face Creams
Stepping into the world of DIY skincare is a game-changer. For most of us who start down this path, the biggest draw is having complete control over what goes onto our skin. When you're the one formulating, you know every last drop, from the foundational oils to the high-performance actives. No more mystery ingredients.
This journey is all about choosing fresh, high-quality ingredients that you love and that your skin loves back. Think organic butters, cold-pressed oils, and fragrant floral hydrosols—the kind of good stuff commercial products often use sparingly, if at all. This level of customization just isn't something you can find on a retail shelf.
Tailoring Formulations for Your Unique Skin
Let's face it, everyone's skin is different. What works wonders for your best friend might be a total dud for you. Making your own face cream lets you become your own personal skincare architect, building a formula that directly addresses your complexion's current mood.
- Got Dry Skin? You can whip up an incredibly rich and nourishing cream using goodies like Shea Butter and Avocado Oil for that deep, lasting hydration your skin is craving.
- Struggling with Oiliness? A lightweight formula is totally achievable. Just select non-comedogenic oils like Grapeseed or Jojoba that moisturize without that heavy, greasy feeling.
- Dealing with Sensitivity? You get to leave out all the common irritants! Instead, you can pack your cream with calming ingredients like Chamomile Hydrosol.
The best part is this isn't a one-and-done deal. You can tweak your recipe as your skin changes with the seasons, your environment, or even your age. It's a living, breathing approach to skincare that evolves right alongside you.
One of the biggest perks of making your own cream is the connection you build with the ingredients and the process. You start to understand how different oils, butters, and hydrosols work together, giving you priceless knowledge about what truly makes your skin happy.
The Foundation of a Great Cream
Before we jump into the fun stuff—the recipes for homemade face creams—it’s good to get a handle on the basic building blocks. At its core, a great cream is a stable emulsion, which is just a fancy way of saying it's a blend of oil and water that won't separate. This is what allows it to deliver moisture effectively.
The main players you'll be working with are butters and oils (this is your oil phase) and distilled water or hydrosols (your water phase). The magic ingredient that brings them together into a smooth, creamy texture is an emulsifier. From there, you can add performance ingredients like peptides and botanical extracts to really level up your cream and help promote a hydrated, radiant glow. This guide will walk you through it all, turning you from a curious beginner into a confident creator.
Getting to Know Your Ingredients and Tools
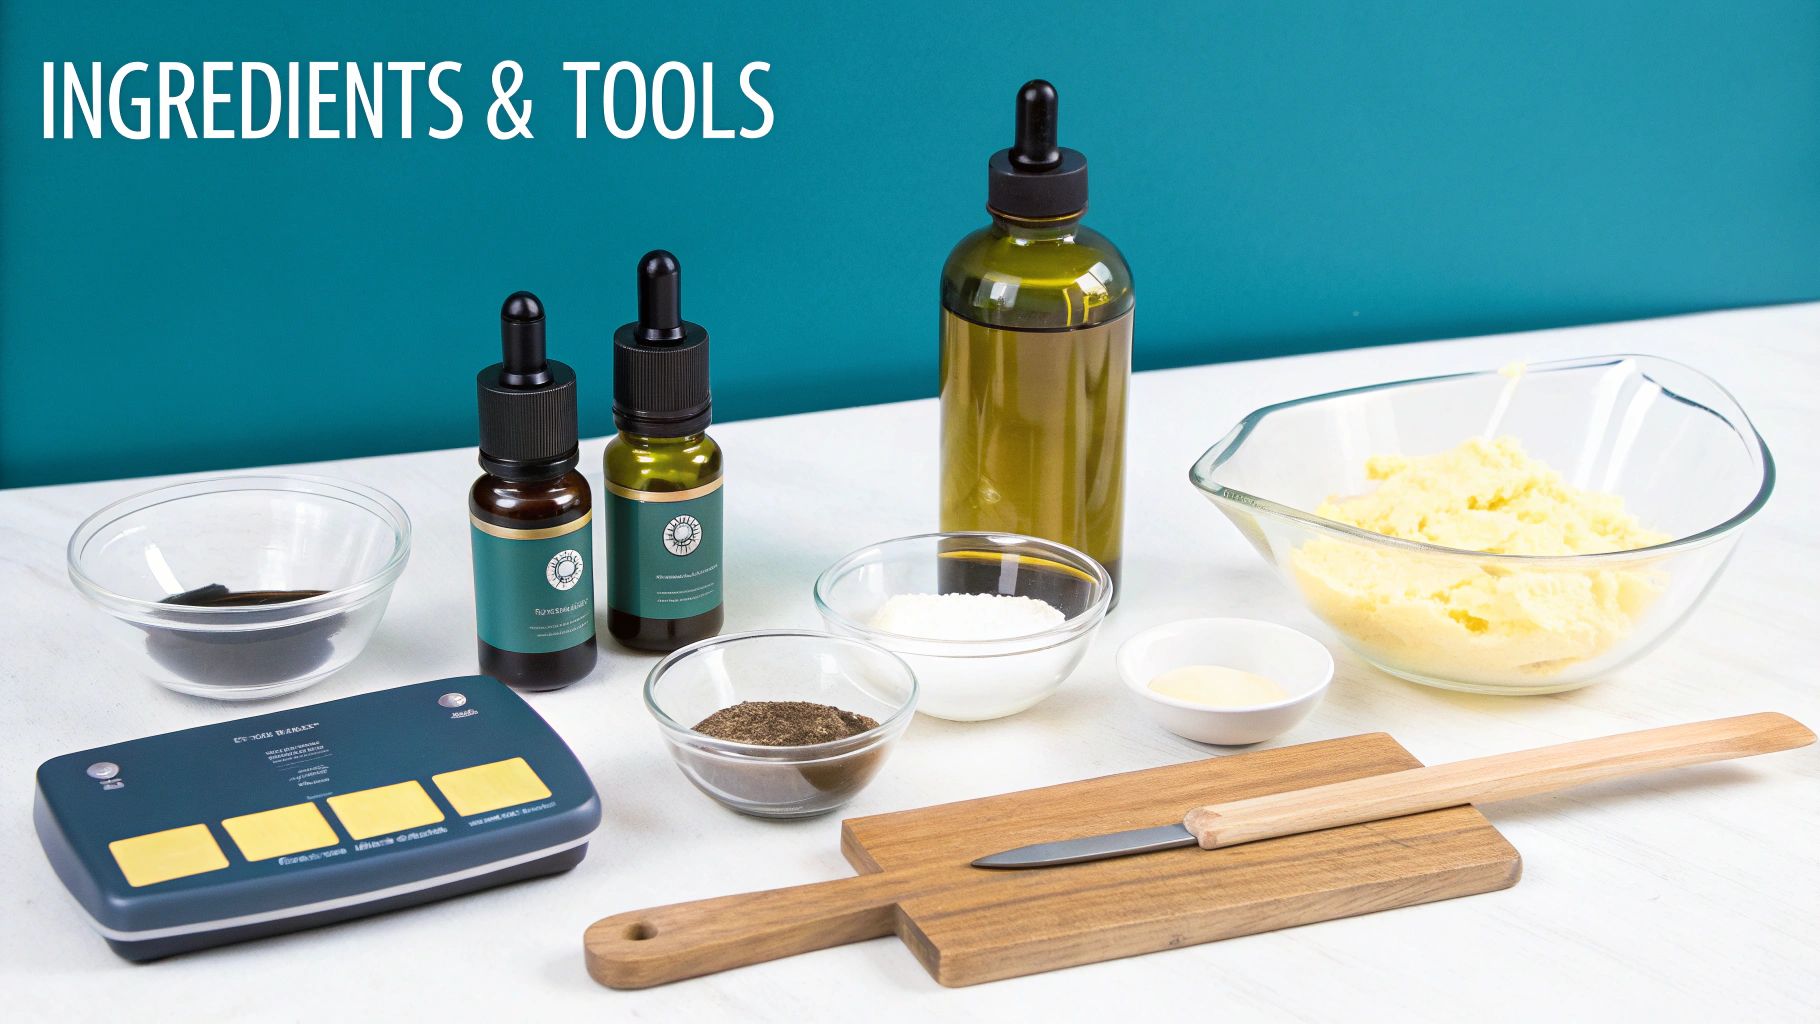
Before you can jump into making beautiful homemade face creams, you have to get familiar with what you'll be working with. Think of it like a painter gathering their palette; every single ingredient and tool plays a part in the final masterpiece. Using the right stuff is what ensures you get a stable, lovely cream, and it’s how you can tailor the final product to exactly what your skin needs.
This is more important now than ever, as people are actively looking for natural, transparent skincare. The global face cream market was valued at an incredible US$57.57 billion in 2023 and is expected to hit US$82.8 billion by 2033. A huge part of that growth comes from the demand for organic, plant-based creams—a perfect match for the DIY world we love.
The Building Blocks: Oils and Butters
At the very core of any face cream is the oil phase, made up of carrier oils and butters. These are the ingredients that give the cream its texture and emollient feel, helping your skin feel soft, smooth, and nourished.
-
Carrier Oils are the liquid fats that serve as the foundation. They all have different properties, so you can pick one based on your skin's personality. Lightweight Grapeseed Oil is a dream for combination skin, while Jojoba Oil is a fantastic all-around choice because it's so similar to our skin's natural sebum. If you have mature or dry skin, richer oils like Avocado Oil can offer more substantial moisture.
-
Butters like Shea, Mango, or Cocoa bring richness and body, giving your cream its structure. Shea Butter is famous for its creamy, ultra-nourishing texture. For something a bit lighter that sinks in beautifully, Mango Butter is a great choice. These butters are solid at room temperature and are key to getting that perfect, thick consistency.
The Water Phase: Hydrosols and More
The water phase is all about hydration. It also acts as the vehicle for any water-soluble goodies you want to add. While simple distilled water works just fine, using a floral hydrosol can elevate your cream to a whole new level of luxury.
Hydrosols, or floral waters, are the aromatic water left behind after steam-distilling plants. Rose Hydrosol is a timeless classic, loved for its delicate scent and its ability to suit most skin types. If you're making a calming nighttime cream, the soothing aromas of Lavender or Chamomile Hydrosols are perfect.
Taking Your Cream to the Next Level with Performance Ingredients
This is where the real magic happens—where you get to customize. Performance ingredients, often called "actives," are added during the cool-down phase to address specific skin appearances.
A crucial takeaway for any home formulator: active ingredients are almost always heat-sensitive. Make sure you add them after the cream has cooled below 40°C (104°F) to keep them potent and effective.
For example, adding peptides can help support a more youthful appearance by improving the look of skin firmness. These are the kinds of powerhouse ingredients you see in high-end skincare, and adding them to your own creations really brings a professional touch home. We offer a curated selection of cosmetic raw ingredients to help you find exactly what you need.
Essential Equipment for Successful Formulation
Having the right tools is just as critical as having quality ingredients. When you're making skincare, precision and cleanliness are non-negotiable for creating a safe, stable cream you can feel good about using. A small investment in a few key pieces of equipment will make the whole process smoother and much more reliable.
Here’s a quick look at the essential tools you’ll want to have in your home skincare lab.
Essential DIY Face Cream Equipment Checklist
| Equipment | Purpose | Where to Find |
|---|---|---|
| Digital Scale | Absolutely essential for accuracy. Formulating by weight (grams) is the professional standard and far more reliable than using measuring spoons. | Online retailers, kitchen supply stores |
| Heat-Resistant Beakers | You'll need at least two glass beakers to heat your oil and water phases separately. They're easy to sanitize and let you see the action. | Science supply stores, online marketplaces |
| Immersion Blender | This is the secret to a perfect, stable emulsion. A stick blender provides the high-shear force needed to bind oil and water together so they don't separate. | Kitchen appliance stores, major retailers |
| Sanitizing Supplies | 70% Isopropyl alcohol is your best friend for sanitizing your workspace, tools, and containers to keep bacteria and mold at bay. | Drugstores, supermarkets |
| Airtight Containers | Store your finished cream in clean, opaque, airtight jars or pump bottles. This protects it from light and air, which can cause ingredients to degrade. | Specialty cosmetic packaging suppliers online |
With this checklist, you'll be well-equipped to start creating fantastic face creams from scratch, safely and effectively.
Getting Hands-On: The Cream Formulation Process
Making your own face cream is a magical experience, a perfect mix of art and science. This is the moment where all your carefully chosen ingredients—oils, butters, and floral waters—come together to create one beautiful, luxurious product. It's so much more than just mixing things in a bowl; it’s about understanding the key stages of formulation to get that stable, silky-smooth cream you're dreaming of.
Let's walk through the process just like a seasoned formulator would. We'll focus on the three critical stages: the oil phase, the water phase, and the cool-down phase. Getting each step right is essential for a professional-quality cream that feels amazing on your skin. We'll also break down the core process of emulsification, which is the real secret behind a perfect, cohesive final product.
Preparing the Oil and Water Phases
The heart of any cream is an emulsion—a stable blend of oil and water. To make this happen, we need to prepare two separate mixtures that we'll eventually combine. This is where your precision really counts. Using a digital scale to measure every single ingredient by weight (grams are standard) is non-negotiable. It's the only way to get consistent, safe, and repeatable results.
First up, your oil phase. This beaker will hold all of your oil-soluble ingredients.
- Carrier Oils and Butters: These make up the foundation of your oil phase. Think skin-loving jojoba oil or creamy, rich shea butter.
- Emulsifying Wax: This is the crucial ingredient that acts as the bridge between your oil and water. Olivem 1000 is a fantastic, natural choice that I often reach for.
- Fatty Alcohols: Ingredients like cetyl alcohol give your cream structure and that elegant, velvety feel. They also help improve the overall stability.
Combine all of these ingredients into one heat-resistant beaker.
At the same time, you'll get your water phase ready in a second heat-resistant beaker. This one is for all your water-soluble ingredients. You might have distilled water, a fragrant floral hydrosol like rosewater, and humectants like glycerin to help your skin attract and hold onto moisture.
The Importance of Heating and Holding
Once you've measured everything out, it's time to apply some heat. Place both of your beakers in a double boiler or a simple saucepan with a few inches of simmering water. The goal here is to gently heat both the oil and water phases to the same temperature, usually somewhere between 70-75°C (158-167°F).
Heating is vital for two reasons. First, it melts down the solid ingredients in your oil phase, like the butters and waxes, so everything can blend together perfectly. Second, holding this temperature for about 20 minutes—a method we call the "heat and hold"—is key to ensuring your final emulsion is strong and stable. Rushing this step is one of the most common reasons creams end up separating later.
A great tip from my own lab experience is to use an infrared thermometer. It lets you check the temperature of both phases without touching the mixtures, which keeps things accurate and sanitary. Once both beakers hit that target temperature and have held it for a bit, you're ready for the most exciting part.
This kind of careful, thoughtful preparation is exactly what people are looking for in skincare now. In fact, the demand for natural and organic face creams is expected to make up 20% of the total market by 2025. This shows a huge shift away from synthetic-heavy products and is what’s fueling the passion for DIY skincare and quality ingredients.
The Magic of Emulsification
This is where the real transformation happens. Emulsification is the step where your separate oil and water mixtures become one gorgeous, unified cream. The process needs both the heat you've just applied and high-shear mixing to break down the liquids into tiny droplets that can suspend within each other.
To start, pour the water phase into the oil phase while you're mixing. For the absolute best results, you'll want to use an immersion blender (also known as a stick blender). Trust me on this one—mixing by hand with a simple whisk just doesn't provide enough force to create a stable, permanent emulsion. You might find your cream looks great at first, only to separate a few days later.
Blend in short bursts for about one to two minutes total. You'll see the mixture transform right before your eyes, going from a thin, watery liquid to an opaque, milky white lotion. As it starts to cool, it will naturally thicken into its final, creamy texture. For a more detailed look at this crucial step, feel free to explore our guide on how to emulsify oil and water.
The Final Touch: The Cool-Down Phase
After that initial burst of high-speed mixing, your emulsion needs to cool down. As it cools, keep stirring it gently with a spatula every few minutes. This prevents a skin from forming on the surface and ensures your final cream has a perfectly smooth and uniform texture.
Once the cream has cooled to below 40°C (104°F), it's time for the cool-down phase. This is when you'll add all of your delicate, heat-sensitive ingredients. If you add them when the cream is still hot, you risk destroying their beneficial properties.
These ingredients usually include:
- Preservatives: An absolute must for any product containing water. This ensures your cream is safe and has a good shelf life.
- Antioxidants: Vitamin E oil is a classic choice. It helps protect your carrier oils from going rancid.
- Performance Ingredients: Now's your chance to add things like peptides or special botanical extracts to address specific skin appearances.
- Essential Oils: Add these for a beautiful, natural fragrance.
Stir each cool-down ingredient in one by one until it's fully incorporated. Once everything is mixed in, your beautiful homemade face cream is complete! All that's left is to transfer it to a clean, sanitized, and airtight container. By mastering these phases, you can confidently create stunning face creams that are not only effective but a true joy to use.
Three Foundational Homemade Face Cream Recipes
Alright, now that you've got the theory down, it's time to get your hands dirty and actually make something! These three foundational recipes are your launchpad. They're designed to build your confidence and show you what's possible.
I've detailed each one with exact measurements in both percentages and grams for a 100g batch. This keeps things precise and makes it super easy to scale up once you find a formula you love.
Think of these as your starting canvas. Each recipe is geared toward a different skin concern, but they are all begging to be customized. Once you get the hang of it, you can start swapping oils, trying new hydrosols, or adding powerful active ingredients to create something that is uniquely yours.
This handy little chart breaks down the core stages of making a cream. It’s a great visual reminder of how the oil and water phases come together before you add the good stuff in the final cool-down phase.
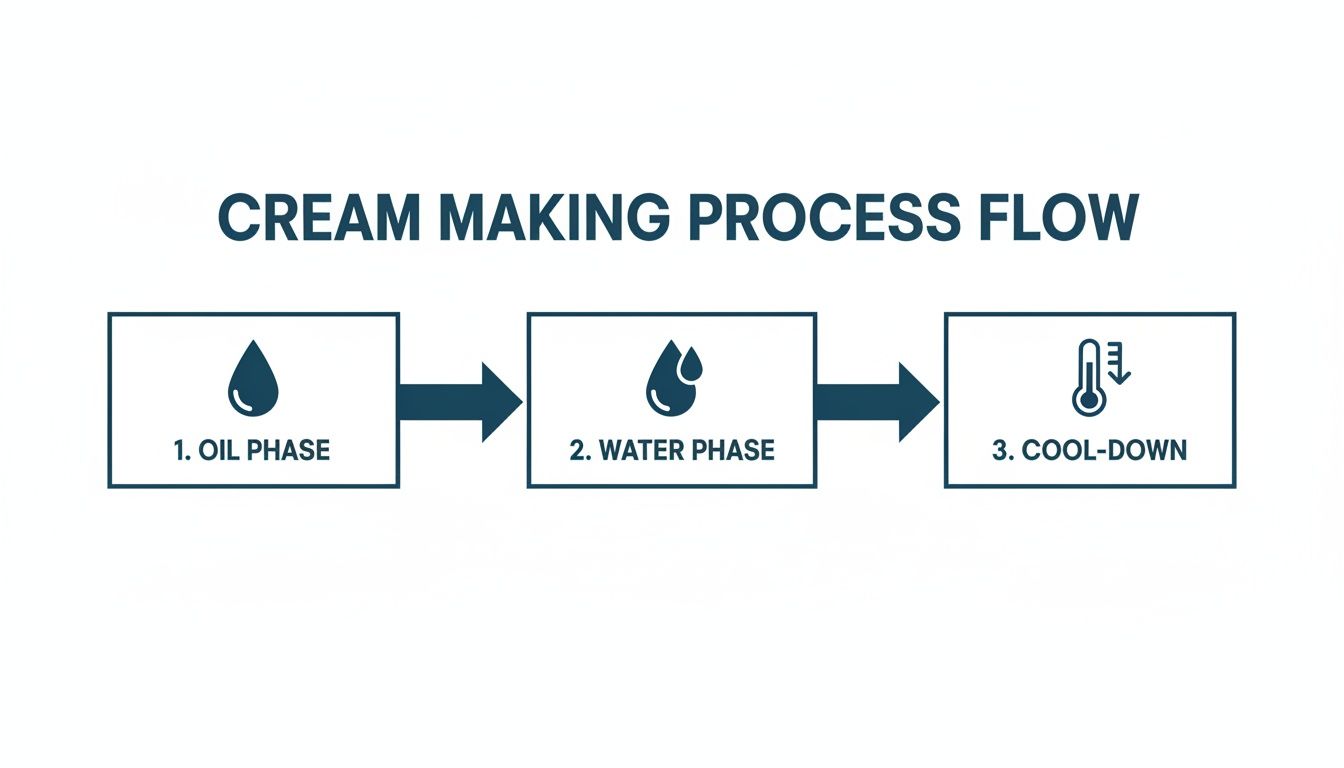
Seeing it laid out like this really reinforces why each step is so important for getting that stable, professional-quality cream we’re after.
Nourishing Cream for Dry or Mature Skin
This is a rich, deeply moisturizing cream that feels absolutely luxurious. It's perfect for skin that's feeling a little thirsty or needs some extra TLC to feel soft and supple again.
Phase A - Oil Phase
- 10% Avocado Oil (10g)
- 8% Shea Butter (8g)
- 5% Olivem 1000 (5g)
- 2% Cetyl Alcohol (2g)
Phase B - Water Phase
- 63.4% Distilled Water (63.4g)
- 5% Vegetable Glycerin (5g)
Phase C - Cool-Down Phase (below 40°C / 104°F)
- 5% Argireline Peptide Solution (5g)
- 1% Vitamin E Oil (1g)
- 1% Geogard ECT Preservative (1g)
To whip this up, just combine all your Phase A ingredients in one beaker and Phase B in another. Gently heat both until they reach 70°C (158°F). Once they're at temperature, pour the water phase into the oil phase and blend with an immersion blender for a solid minute. Let it cool, giving it a stir now and then, before adding your Phase C ingredients.
Expert Customization Tip: For an extra touch of luxury that mature skin will adore, try swapping the distilled water for Rose Hydrosol. The subtle floral scent and skin-loving properties of rose really elevate this cream.
Lightweight Balancing Cream for Oily or Combination Skin
If you need hydration without that heavy, greasy feeling, this one's for you. It’s formulated to be light and fast-absorbing, using non-comedogenic oils that won't clog your pores.
Phase A - Oil Phase
- 8% Grapeseed Oil (8g)
- 4% Jojoba Oil (4g)
- 4% Emulsifying Wax NF (4g)
- 2% Cetyl Alcohol (2g)
Phase B - Water Phase
- 73.6% Witch Hazel Hydrosol (73.6g)
- 2% Sodium Lactate (2g)
Phase C - Cool-Down Phase (below 40°C / 104°F)
- 1% Vitamin E Oil (1g)
- 1% Preservative Eco (1g)
- 0.4% Tea Tree Essential Oil (0.4g)
The process is exactly the same: heat both phases separately to 70°C (158°F), then combine and blend away. The Witch Hazel Hydrosol adds a wonderful clarifying feel that works beautifully with the lightweight oils. Once it’s cool, stir in your cool-down ingredients one by one.
Gentle Soothing Cream for Sensitive Skin
For skin that gets easily irritated, simplicity is key. This recipe uses a minimal set of ingredients known for their gentle and calming properties, steering clear of common triggers.
Phase A - Oil Phase
- 12% Apricot Kernel Oil (12g)
- 3% Mango Butter (3g)
- 5% Olivem 1000 (5g)
Phase B - Water Phase
- 73% Chamomile Hydrosol (73g)
- 5% Glycerin (5g)
Phase C - Cool-Down Phase (below 40°C / 104°F)
- 1% Allantoin Powder (1g - pre-dissolved in a small amount of the warm water phase)
- 1% Geogard ECT Preservative (1g)
This cream is intentionally stripped back. Heat your oil and water phases, emulsify them, and let the mixture cool. Allantoin is a fantastic soothing ingredient, but here's a pro tip: make sure you dissolve it completely in a bit of your warm water phase before adding it. This prevents any grainy texture in your final cream.
For more inspiration on your DIY journey, you can check out our other guides on how to make your own moisturizer.
The table below is a quick-reference guide to help you get creative and start tailoring these recipes to your specific skin goals.
Ingredient Customizations for Different Skin Goals
| Skin Goal | Recommended Oils | Recommended Butters | Recommended Actives |
|---|---|---|---|
| Youthful Appearance | Rosehip, Argan, Pomegranate Seed | Cupuacu, Shea | Peptides, Vitamin C |
| Oily-Prone | Grapeseed, Hemp Seed, Jojoba | None (or light like Mango) | Niacinamide, Tea Tree Oil |
| Brightening | Lemon Peel, Sea Buckthorn | Murumuru, Cocoa | Vitamin C, Licorice Root Extract |
| Hydrating | Avocado, Sweet Almond, Squalane | Shea, Mango, Cocoa | Hyaluronic Acid, Glycerin, Sodium Lactate |
Use this as a jumping-off point. The fun really starts when you begin experimenting with different combinations to find what your skin truly loves.
Once you’ve mastered the basics with these recipes, the sky's the limit. You'll be ready to explore more complex formulas, much like the diverse lotions and potions you see out in the beauty world. Consider these recipes your official entry into the creative and incredibly rewarding world of making your own skincare.
Ensuring the Safety and Shelf Life of Your Creams
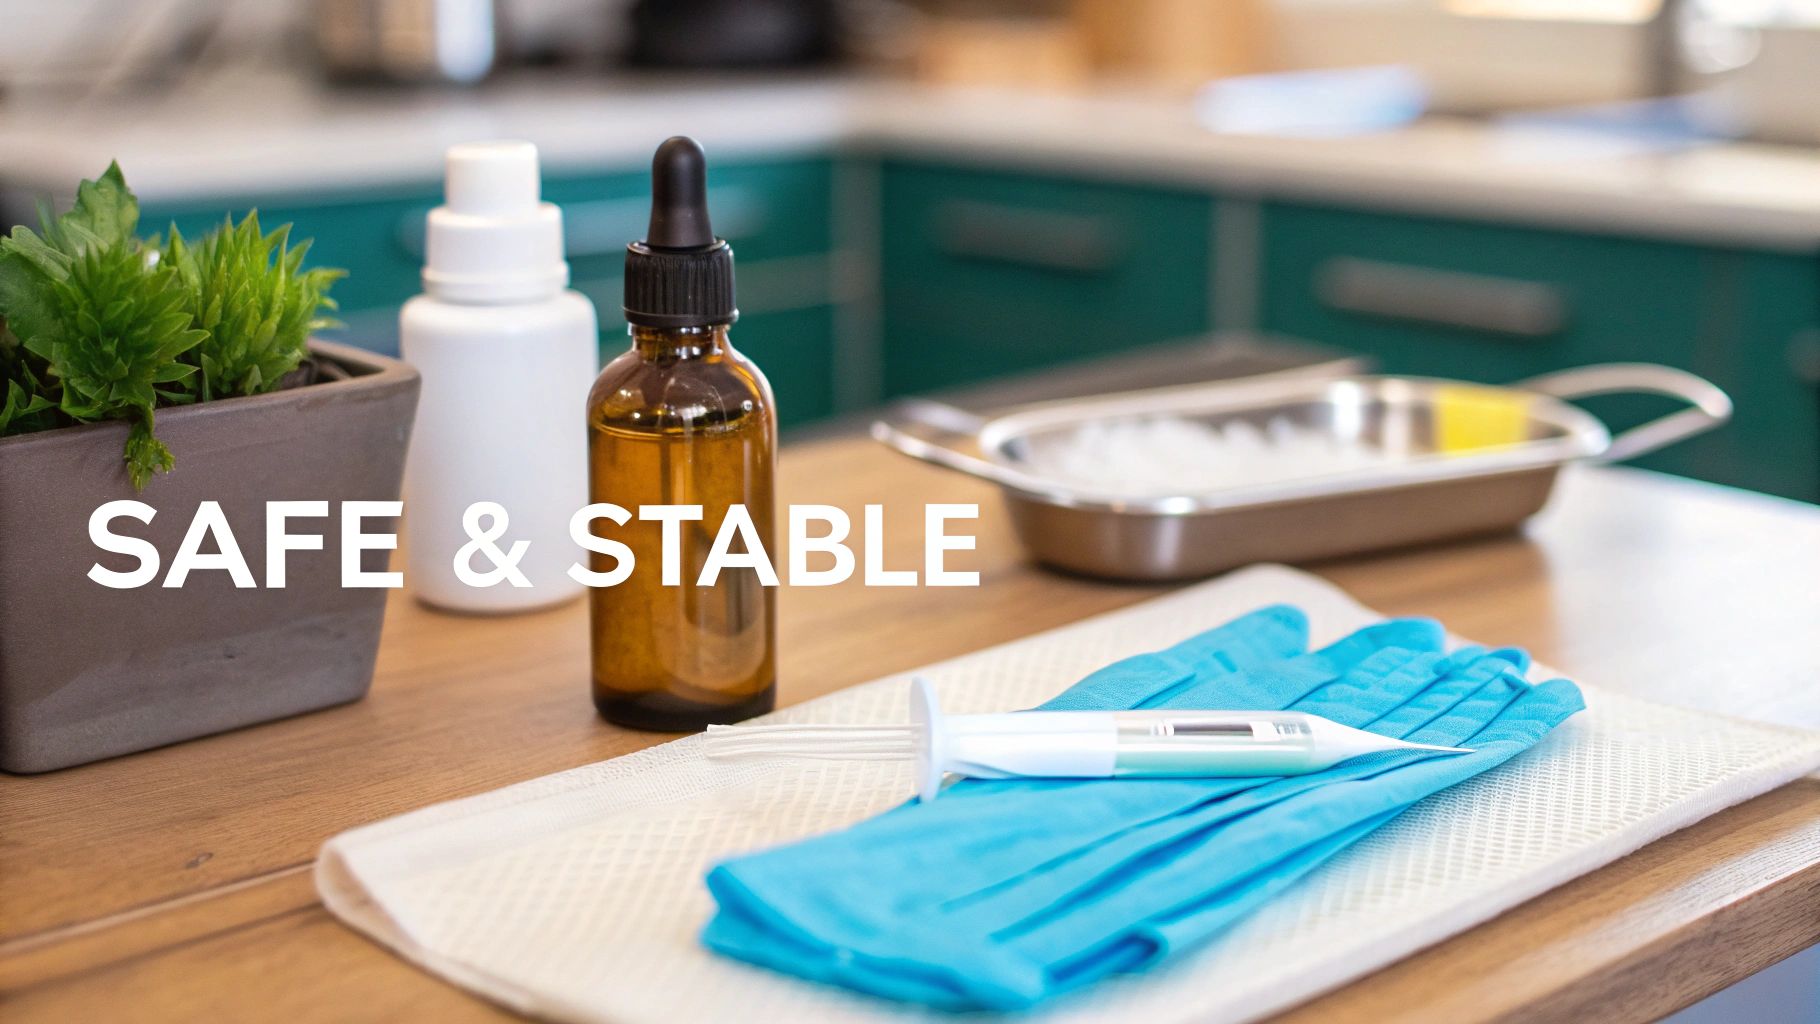
Creating a beautiful, silky cream is an exciting accomplishment, but your work isn’t quite finished once the emulsion forms. Making sure your creation is safe and stable is just as crucial. Here’s the simple truth: any recipe that contains water—and that includes hydrosols or aloe—is the perfect environment for unwanted microbial growth.
This is exactly why adding a preservative is non-negotiable. Without one, nasty things like bacteria, yeast, and mold can start to flourish in just a few days, turning your lovely cream into something you definitely don't want on your skin. This step is a cornerstone of responsible DIY skincare.
Choosing the Right Preservative
The idea of selecting a preservative can feel intimidating at first, but it's pretty straightforward once you know the basics. You’ll need a broad-spectrum preservative, which simply means it’s effective against the trifecta of contaminants: bacteria, yeast, and mold.
Not all preservatives are created equal, so it's essential to pick one specifically designed for cosmetic use. Here are a couple of my go-to options:
- Geogard ECT (Preservative Eco): This is a popular choice in the natural skincare world. It's effective and widely accepted in organic formulations.
- Liquid Germall Plus: A potent and highly reliable option that works wonderfully in a wide range of recipes for homemade face creams.
Always add your preservative during the cool-down phase when the cream is below 40°C (104°F). Be sure to follow the supplier’s recommended usage rate, which is typically between 0.5% to 1.0% of your total formula. If you want to take a deeper dive, you can learn more about choosing a natural skin care preservative.
Good Manufacturing Practices Start at Home
Your safety measures begin before you even measure your first ingredient. Working in a clean, sanitized environment is critical to minimizing contamination right from the start.
Think of your workspace as a mini-lab. I always wipe down all my surfaces with 70% isopropyl alcohol and meticulously sanitize every single tool—beakers, spatulas, and the immersion blender—before I even think about starting. This simple habit drastically reduces the risk of introducing microbes into your product.
Remember: Cleanliness isn't just about the final product's safety; it's about respecting the craft. Following good manufacturing practices ensures your homemade creams are something you can feel genuinely proud of and confident in using.
Storage and Determining Shelf Life
How you store your cream has a huge impact on its longevity. Light and air are the enemies of delicate ingredients and can compromise your preservative system over time.
Always package your final product in opaque, airtight containers, like pump bottles or jars that have protective inner lids. This shields the cream from exposure that can accelerate spoilage. Storing it in a cool, dark place like a cabinet or drawer will also help maintain its freshness.
When properly preserved and stored, your homemade cream can easily have a shelf life of 6 to 12 months. The growing demand for organic skincare, a market projected to hit US$28.54 billion by 2034, really highlights how much people appreciate quality ingredients and careful formulation. Creating your own products lets you be a part of this movement right from your own home. To learn more about how to keep your beautiful creations fresh, you can delve into the shelf life secrets of natural products.
Common Questions About Making Face Creams
Jumping into the world of DIY skincare is a ton of fun, but it's totally normal to have questions pop up. Whether you're trying to figure out a recipe that went wrong or you're just curious about the process, getting clear answers is how you build real confidence. Let's go over some of the most common questions we hear from fellow skincare creators.
Can I Make a Cream Without a Preservative?
This is probably the most important question we get. While you can absolutely make anhydrous (water-free) products like body butters and balms without a preservative, it's a completely different ballgame with creams.
Any recipe that includes water, hydrosols, or aloe vera must have a broad-spectrum preservative. No exceptions. Without one, nasty stuff like bacteria, mold, and yeast can start growing in just a few days, even if you stick it in the fridge. For safety and a decent shelf life, using a proper cosmetic preservative is non-negotiable in any of our recipes for homemade face creams that contain water.
Why Did My Homemade Face Cream Separate?
Ah, the dreaded separation. It’s a classic sign of a broken emulsion and a hurdle most of us face when we're starting out. It almost always comes down to one of a few things:
- Not Enough Emulsifier: You might not have used enough emulsifying wax to hold your oil and water phases together. A solid rule of thumb is to have your emulsifier make up about 20-25% of the total weight of your oil phase.
- Mismatched Temperatures: This is a big one. Both your oil phase and your water phase need to be heated to the same temperature before you combine them. You're aiming for a sweet spot around 70-75°C (158-167°F).
- Not Enough Power: Hand-whisking just doesn't cut it here. You really need the high-shear force of an immersion blender (or stick blender) to create those super-tiny, stable droplets that keep your cream from separating later on.
How Can I Adjust a Recipe for My Skin Type?
This is the best part of making your own skincare—customization! The easiest place to start is with your oil phase. If you have oily or combination skin, try swapping heavier oils for lighter, non-comedogenic ones like grapeseed or jojoba oil. On the flip side, if your skin is super dry, richer ingredients like avocado oil or luscious shea butter will be your best friends.
You can also play around with the water phase by using different hydrosols—think rose for mature skin or calming chamomile for sensitive types. And don't forget the cool-down phase! This is where you can add powerful active ingredients, like peptides, to give your cream a youthful boost. For more tips on making your skincare truly your own, check out our other guides on how to create skin care products.
When you preserve it correctly, a homemade cream can easily have a shelf life of 6 to 12 months. The exact lifespan depends on the preservative you choose, how fresh your oils are, and keeping it stored in a cool, dark place. Always use a clean spatula or scoop to get your cream out of the jar—this helps minimize contamination and keeps it fresh longer!
Ready to start crafting? Skin Perfection has a full lineup of high-quality DIY lotion-making supplies, from beautiful butters and oils to high-performance peptides. You'll find everything you need to create your perfect cream today at https://www.naturalorganicskincare.com.