
 Buy with Prime


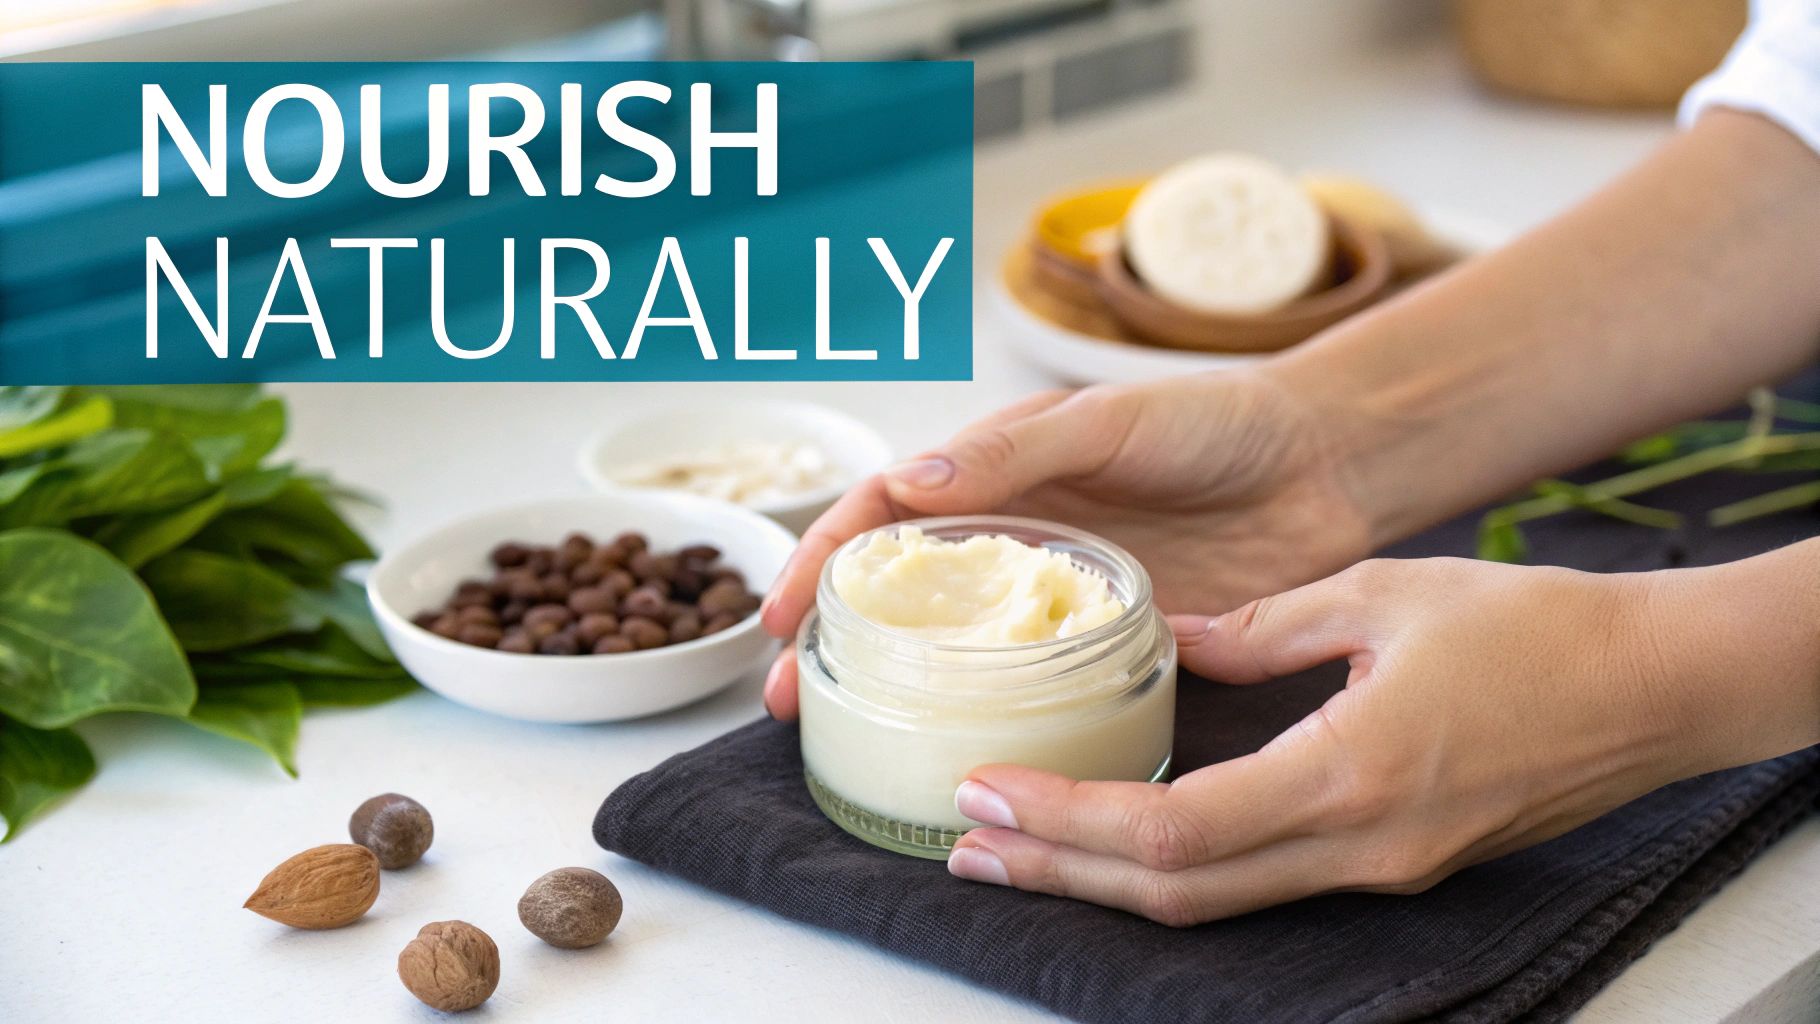
Making your own body butter is a surprisingly simple dance of melting, cooling, and whipping rich butters and oils together. The result? A deeply moisturizing cream that feels absolutely luxurious. This straightforward process lets you create a high-quality product right in your own kitchen, giving you total control over every single ingredient for a truly personalized skincare treat.
Why Homemade Body Butter Is a Skincare Game-Changer
Whipping up your own body butter is so much more than a fun weekend project; it’s an empowering way to take your skincare routine to the next level. When you're in charge of the formula, you get to hand-pick the butters, oils, and even high-performance actives that perfectly match your skin's unique needs and goals.
This is exactly why so many people are falling in love with DIY skincare. Unlike most store-bought lotions where water is the main ingredient, body butters are typically anhydrous (water-free). That means you're applying a potent, undiluted blend of nourishing goodness directly to your skin for incredible moisture and a silky, protective barrier.
The Rise of Personalized Skincare
The move toward personalized beauty isn't just a fleeting trend—it's a clear signal that we all want more transparency and control over what we put on our bodies. And learning to make body butter couldn't be more relevant. The market for it was valued at USD 4.5 billion in 2024 and is expected to hit USD 8.2 billion by 2034, growing at a steady clip of 6.5% each year. With North America making up about 35% of that market, it’s clear we have a love affair with these rich, buttery creams.
By crafting your own products, you step away from generic, one-size-fits-all formulas and create something that is uniquely yours. You decide the texture, the scent, and the star ingredients, ensuring every jar is made with intention.
This hands-on approach connects you more deeply to your daily regimen, turning a routine chore into a creative and rewarding ritual. It also opens up a whole world of natural ingredients to explore. For those who love discovering nature’s best, looking into other luxury skincare secrets like The Camel Soap can offer even more inspiration for nourishing your skin.
What to Expect in This Guide
I’m here to walk you through everything you need to know. We’ll cover the foundational butters like Shea and Mango, beautiful carrier oils, and even optional performance-boosters to elevate your creation. Once you understand the role each ingredient plays, you'll be able to confidently whip up a body butter that leaves your skin feeling pampered and radiant.
If you're curious to learn more about why this approach is so powerful, you can explore the benefits of using natural and organic products in our other article.
Getting Your Ingredients and Essential Tools in Order
The secret to a truly luxurious body butter isn't just in the whipping—it starts long before you even turn on the mixer. It’s all about choosing beautiful, high-quality ingredients and having the right tools ready to go. Think of this as your game plan for crafting a perfect, deeply moisturizing body butter from scratch.
The soul of any body butter is, well, the butters! Each one brings its own unique personality to the party, influencing everything from the texture and richness to how it melts into your skin. Getting to know these differences is the first step toward creating a formula that you'll fall in love with.
Choosing Your Core Butters
The butter you pick will define the entire experience of your final product. While the world of butters is vast, three classics stand out for their incredible properties and consistent results.
- Shea Butter: This is the undisputed champion of the body butter world. It’s known for its incredibly creamy, rich texture and deeply moisturizing feel, making it the perfect starting point for most DIY creators.
- Cocoa Butter: Famous for that wonderful, subtle chocolate aroma, cocoa butter is a much harder butter at room temperature. This creates a firmer, more protective body butter that has a gorgeous melt-on-contact feel.
- Mango Butter: If you’re aiming for something a bit lighter and less greasy, mango butter is your best friend. It’s smoother and a little harder than shea but absorbs more quickly, leaving behind a velvety-soft finish without the weight.
Using butters like shea for skincare isn't a new trend; it’s a practice with deep historical roots, particularly in West Africa where its use dates back at least 2,000 years. This ancient tradition has exploded into a global phenomenon. In fact, by 2022, the shea butter market was valued at an astounding USD 2.17 billion, and it's projected to climb to USD 3.75 billion by 2030. If you're curious about this incredible growth, you can discover more insights about the shea butter market growth on futuremarketinsights.com.
Selecting Your Carrier Oils
Carrier oils are the liquid heroes that you'll blend with your solid butters. They're essential for tweaking the final consistency, adding a beautiful glide, and bringing their own set of skin-loving benefits to the formula.
A fantastic starting point for any basic body butter recipe is a ratio of roughly 75% solid butters to 25% liquid oils by weight. Feel free to play with this—a little more oil will give you a softer butter, while a little less will make it firmer.
Here are a few of my go-to carrier oils:
- Coconut Oil: This incredibly versatile oil can be solid or liquid depending on the temperature of your room. It adds fantastic slip and a moisturizing feel that so many people adore.
- Jojoba Oil: Here’s a fun fact: jojoba is technically a liquid wax, not an oil. It’s prized because its molecular structure is incredibly similar to our skin’s own natural sebum, which means it absorbs like a dream without feeling heavy or greasy.
- Sweet Almond Oil: A true skincare classic, sweet almond oil is a lightweight, all-purpose oil that feels wonderfully gentle and nourishing on the skin.
You can find a great selection of these core ingredients by browsing our collection of cosmetic raw ingredients to get started on your perfect blend.
Choosing Your Base Butters and Oils
Selecting the right butters and oils is the most creative part of making body butter. The combination you choose will directly impact the final product's feel, from a thick, protective balm to a light, airy whip. Think about what your skin needs and what kind of texture you enjoy the most.
Here’s a quick comparison to help you decide:
| Ingredient | Texture Profile | Best For | Skin Perfection Product Link |
|---|---|---|---|
| Shea Butter | Creamy, rich, and dense. Slow-absorbing for lasting moisture. | Dry, dehydrated, or mature skin. | Organic Shea Butter |
| Cocoa Butter | Very hard and brittle at room temp. Creates a thick, protective barrier. | Very dry or chapped skin. Great for creating firm balms. | Cocoa Butter Wafers |
| Mango Butter | Smooth and semi-solid, but less greasy than shea. Absorbs well. | All skin types, especially those who prefer a non-greasy finish. | Refined Mango Butter |
| Coconut Oil | Light and silky. Can be solid or liquid depending on temperature. | Normal to dry skin. Adds great slip and a moisturizing feel. | Organic Coconut Oil |
| Jojoba Oil | Lightweight liquid wax. Mimics skin's natural sebum for fast absorption. | Oily or sensitive skin types. Helps balance the look of oily skin. | Jojoba Oil |
| Sweet Almond Oil | Light to medium weight oil. Softening and nourishing. | All skin types, particularly sensitive or dry skin. | Sweet Almond Oil |
Don't be afraid to mix and match! A popular combination is shea butter for creaminess, a little cocoa butter for firmness, and sweet almond oil to soften the mixture. Experimenting is how you'll find your signature blend.
Your Must-Have Tools for Success
You don’t need a fancy lab to make incredible body butter, but a few key pieces of equipment will make the process foolproof, clean, and easy to repeat.
- Digital Kitchen Scale: This is non-negotiable. Precision is everything in formulating. Measuring your ingredients by weight (grams or ounces) is the only way to get consistent, reliable results every single time you make a batch.
- Double Boiler (or a DIY version): Gently melting your ingredients is crucial. You never want to put them over direct heat, as it can scorch the butters and oils. A dedicated double boiler is great, but a simple heat-safe glass bowl placed over a saucepan of simmering water works perfectly.
- Electric Mixer: This is the tool that creates the magic. To get that iconic, light-as-air whipped texture, you’ll need an electric hand mixer or a stand mixer. Whipping air into the cooled mixture is what transforms it from a solid balm into a fluffy cloud.
- Spatula and Containers: A good silicone spatula will be your best friend for scraping every last drop of product out of the bowl. And of course, make sure you have some clean, airtight jars ready to store your gorgeous final creation.
Crafting Your Body Butter from Start to Finish
Alright, this is the fun part—the moment we turn our amazing ingredients into a jar of rich, luxurious body butter. The whole process is a simple dance: measure, melt, cool, and whip. Get these steps right, and you'll nail that perfect, cloud-like texture that feels incredible on your skin, never greasy.
Making your own body butter is such a hands-on experience, connecting you to what you're putting on your skin. Let's walk through it together. I'll share a few insider tips along the way to make sure your first batch is an absolute success.
Why Precise Measurements Matter
Before you even think about turning on the heat, let's talk precision. When it comes to making skincare, guessing is a surefire way to get inconsistent results. Using a digital kitchen scale to measure your butters and oils by weight (grams or ounces) is the single most important thing you can do to get it right every single time.
Why not just use cups or tablespoons? Those volume measurements can be surprisingly inaccurate depending on how you pack your ingredients. Weight, on the other hand, never lies. It's the secret to creating a beautiful texture that you can perfectly replicate again and again.
Gentle Melting with a Double Boiler
Once everything is weighed out, it's time to melt your solid butters and oils into a single, cohesive liquid. The golden rule here is to use gentle, indirect heat. If you just toss your ingredients in a pot directly on the stove, you risk scorching them, which can diminish their beneficial properties and leave you with a burnt smell. No thank you.
A double boiler is your best friend here. Don't have one? No problem, you can easily make one:
- Find a heat-safe glass or stainless steel bowl that fits snugly over a saucepan.
- Fill the saucepan with an inch or two of water and bring it to a simmer.
- Make sure the bottom of the bowl isn't touching the water—it’s the steam that will do the melting.
- Start with your hardest butters, like cocoa butter. Once they've started to melt, you can add your softer butters (like shea) and any liquid oils.
Give it an occasional stir until everything has melted into a beautiful, smooth, golden liquid. This gentle method keeps all those precious ingredients intact.
The Critical Cooling Phase
Pay close attention here, because this is where many DIY-ers go wrong and end up with a grainy body butter. After everything is melted, you must cool the mixture properly before you even think about whipping it. Rushing this step will prevent the fats from solidifying correctly, giving you a gritty texture instead of a smooth one.
Pour the melted mix into the bowl you'll be using for whipping, then pop it in the refrigerator or freezer. You want to chill it until it turns opaque and gets firm around the edges, but the center is still a bit soft—think of the consistency of a soft-set pudding.
Pro Tip: Stir the mixture every 10-15 minutes while it cools. This might seem tedious, but it helps everything cool down evenly and stops butters like shea from forming those little crystals that cause graininess. This one small step makes a world of difference for a silky-smooth finish.
Whipping Your Butter into a Fluffy Cloud
Now for the magic. Once your butter and oil mixture has reached that perfect cooled consistency, it’s time to whip it up. An electric mixer is non-negotiable for this part; it's the only way to incorporate enough air to transform the dense balm into a light, airy cream.
For that truly fluffy texture, an electric whisk is the perfect tool. Start on a low speed to get everything combined, then crank it up to high.
Whip for about 5 to 10 minutes. You'll literally see it transform—the color will lighten, and the volume will increase dramatically. You'll know it's done when it's thick enough to form stiff peaks, just like whipped cream.
If you're curious about other ways to create creamy skincare, you can explore our guide on how to make moisturizer, which covers different techniques for water-based lotions, too.
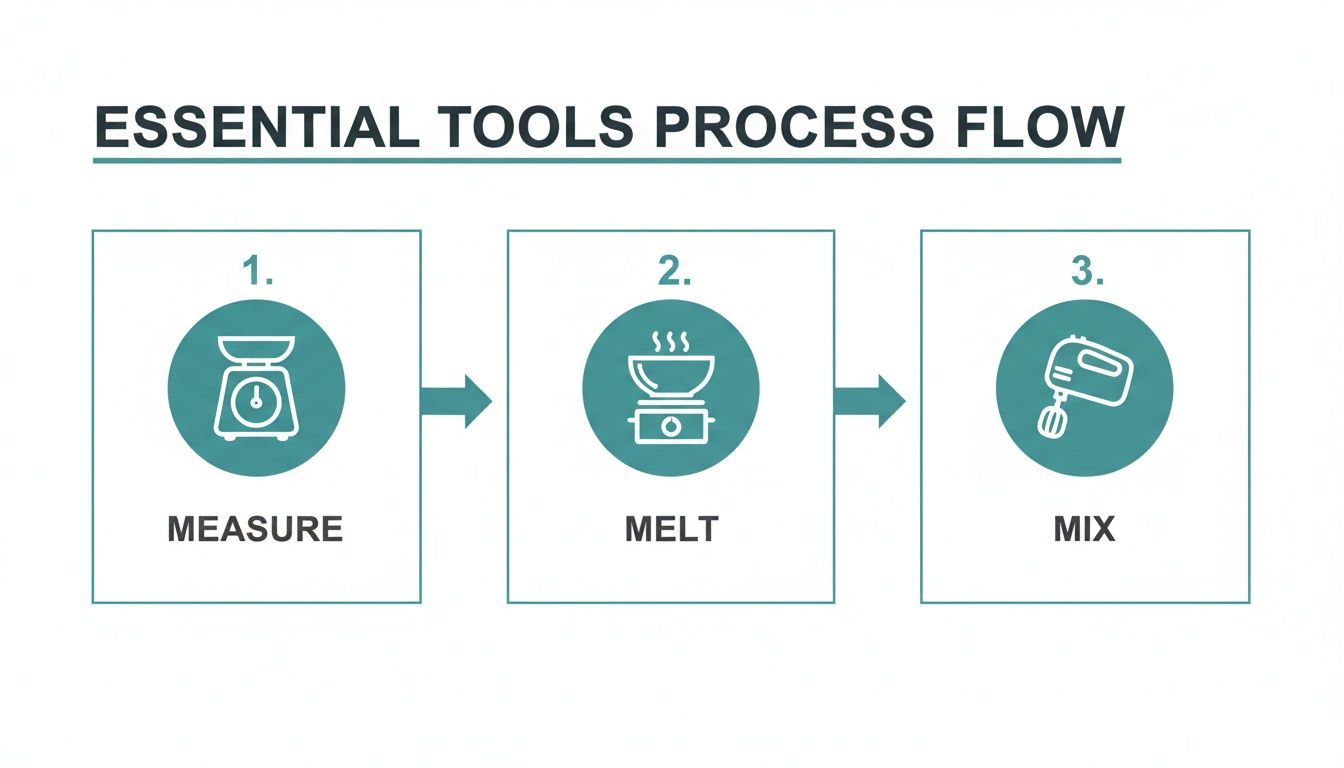
This visual shows the simple, yet vital, actions that take your raw ingredients and turn them into a finished product: measure, melt, and mix.
Adding Final Touches at the Right Time
Thinking of adding delicate ingredients like essential oils for fragrance or special actives? Timing is everything. These should only go in after the butter has been chilled and whipped, during the very last minute of mixing.
If you add them when the oil mixture is hot, their scent and beneficial properties can degrade or evaporate. By waiting until the butter is cool and fluffy, you ensure these precious extras are perfectly preserved. Once they're in, give the butter a final 30-second whip to mix them through.
And that's it! All that's left is to scoop your gorgeous, handmade body butter into a clean, airtight jar.
Making It Your Own: A Guide to Custom Formulas
Once you've got the basic whipping technique down, the real fun begins. This is your chance to move beyond a standard recipe and start crafting a body butter that’s uniquely yours. Think of it as elevating a simple moisturizer into a truly bespoke skincare treatment, tailored to exactly what your skin needs and what you love.
We're seeing a big shift in homemade body butters. It's not just about simple butters and oils anymore. The trend is moving toward more sophisticated formulas that pack in powerful, active ingredients. While raw shea butter still holds its own (we all love a natural base!), the demand for refined butters is growing fast. Why? Because their consistent texture and neutral scent create the perfect blank canvas for these exciting additions. You can actually see this trend reflected in market data—check out the full research on the shea body butter market if you're curious.
Level Up Your Butter with High-Performance Ingredients
Adding performance-driven ingredients is how you turn a simple body butter into a targeted, powerhouse formula. These are potent actives, so a little goes a long way. You’ll typically want to keep them between 1-3% of your total recipe weight—enough to be effective without messing up your butter's beautiful texture.
The timing here is everything. Always, always add these delicate actives during the final whipping stage, once the mixture is completely cool. If you add them while it's warm, you'll destroy their complex structures and lose all those amazing benefits.
Here are a few of my favorite additions to get you started:
- Peptides: These are fantastic for promoting a firmer, more youthful appearance.
- Plant-Based Extracts: Think green tea or sea buckthorn extract. They are loaded with antioxidants that can help brighten the look of your skin and give it a healthy, luminous glow.
- Hyaluronic Acid (Oil-Soluble): For that next-level hydration, oil-soluble hyaluronic acid is a game-changer. It helps your skin feel incredibly plump and deeply moisturized.
By adding ingredients like these, you're not just making a body butter anymore. You're formulating a high-performance skin product from scratch. That personal touch is what makes DIY so rewarding.
Crafting a Signature Scent and Color
Scent and color are the finishing touches that make your body butter feel like a true luxury. It's crucial, though, to only use ingredients specifically made for safe skincare application.
For a gorgeous, natural fragrance, here are a few tips:
- Essential Oils: You only need a few drops. Lavender is wonderfully calming, sweet orange is bright and uplifting, and a touch of peppermint feels incredible on tired feet.
- Fragrance Oils: Craving a scent you can't find in nature, like warm vanilla bean or salty ocean air? Just make sure you're using high-quality, phthalate-free fragrance oils designed for use on skin.
- Get Creative with Blends: Don't be afraid to play around! A simple mix of lavender and chamomile, for instance, creates the perfect soothing butter to apply right before bed.
The perfect time to add your scent is during the last minute or so of whipping. If you add fragrance to hot oils, the delicate aromatic compounds will simply evaporate. Wait until the butter is cool and fluffy to lock in that beautiful aroma.
Adding a Touch of Visual Magic with Color
A little color can make your body butter look just as amazing as it feels. My go-to for this is always mica powder.
- Mica Powders: These are natural, cosmetic-grade mineral pigments that come in every color imaginable. They are skin-safe and easy to work with.
- How to Use Them: A tiny amount is all you need. Start with just 1/8 teaspoon per cup of body butter. Add it during the final whipping stage and blend until it's completely mixed in.
- The Effect: A touch of gold or bronze mica can give your skin a beautiful, sun-kissed shimmer. A soft pink or lavender can give the butter itself a lovely, calming look in the jar.
Always buy your colorants from a trusted supplier to ensure they are cosmetic-grade and free from any contaminants. This final attention to detail is what separates a homemade product from a truly professional-quality one.
Troubleshooting Common Body Butter Problems
Even the most seasoned DIY skincare enthusiast hits a snag now and then. Making body butter is a creative, hands-on process, and a little tweaking is often part of the journey to your perfect formula. Don't sweat it if a batch doesn't come out quite right—most of the common issues are surprisingly easy to fix and are fantastic learning opportunities.
Let's walk through the most frequent challenges you might encounter. Think of this as your go-to cheat sheet for turning a potential "oops" into a successful, luxurious body butter.
Why Is My Body Butter Grainy?
A grainy or gritty texture is probably the number one hiccup people run into, and it almost always comes down to how the butter cools. Ingredients like shea butter are packed with different fatty acids that all melt and solidify at different temperatures. If the mixture cools down too slowly, these fats can go their separate ways, forming tiny, hard crystals. The result? That unpleasant gritty feel.
Fortunately, the fix is a breeze:
- Re-melt Gently: Pop your grainy butter back into a double boiler and melt it down completely until it's smooth again.
- Cool It Down, Fast: This is the crucial step. To prevent those crystals from reforming, you need to speed up the cooling process. Place the bowl of melted oils into the refrigerator or even the freezer.
- Stir, Stir, Stir: Give the mixture a good, vigorous stir every 10-15 minutes. This constant agitation keeps the fats from separating and ensures a silky-smooth consistency.
Once the mixture is opaque and looks firm around the edges, it's ready for whipping. This quick-chill method is your secret weapon for a consistently creamy batch every single time.
My Butter Feels Too Greasy. Now What?
One of the main complaints about homemade body butter is that it can feel heavy or greasy on the skin. This is usually a simple matter of the specific butters and oils you've chosen, but it's another easy fix that doesn't require starting from scratch.
The secret to cutting that greasy feeling is adding a touch of cosmetic starch. A small amount of arrowroot powder or tapioca starch works like magic, absorbing excess oiliness and leaving a much more velvety, powdery finish on your skin.
A good starting point is to add one teaspoon of arrowroot powder per cup of your melted oil mixture right before you chill it. This tiny addition can dramatically change the skin-feel without taking away any of the moisturizing goodness. For future batches, you could also try incorporating "dry" or fast-absorbing oils like grapeseed or jojoba into your recipe.
Help! My Butter Is Too Hard or Too Soft.
Did your finished product turn out rock-solid, or is it more like a runny lotion? This is purely a game of ratios. The final firmness of your body butter is all about the balance between your hard butters (like cocoa or kokum butter) and your liquid oils (like sweet almond or jojoba).
- If It's Too Hard: No problem. Just gently re-melt the butter and stir in a bit more liquid carrier oil. Add it one tablespoon at a time until you like the consistency.
- If It's Too Soft: You guessed it—re-melt it and add a small amount of a harder butter. Cocoa butter is excellent for this. A little cosmetic-grade beeswax will also do the trick, helping it set up much more firmly.
Sometimes, especially in recipes without an emulsifier, you might see the oils separate or "weep" from the butter over time. While this guide focuses on anhydrous (water-free) formulas, understanding how ingredients bind together is key for more advanced recipes. If you start venturing into making lotions, which combine oil and water, you'll want to learn more about what emulsifying wax does to create perfectly stable blends.
Quick Fixes for Body Butter Problems
Even with the best intentions, things can go sideways. Here’s a quick-reference table to help you diagnose and solve the most common body butter issues in a flash.
| Problem | Likely Cause | Solution |
|---|---|---|
| Grainy or Gritty Texture | The butter cooled too slowly, causing fat crystals to form. | Re-melt gently, then cool quickly in the fridge, stirring every 10-15 mins. |
| Feels Greasy on Skin | The ratio of heavy oils and butters is too high. | Add 1 tsp of arrowroot powder or tapioca starch per cup of oils during the melting phase. |
| Too Hard to Scoop | Too much hard butter (e.g., cocoa, kokum) in the recipe. | Re-melt and add more liquid carrier oil, one tablespoon at a time. |
| Too Soft or Runny | Not enough hard butter or wax to solidify the mixture. | Re-melt and add a small amount of a hard butter (like cocoa) or a little beeswax. |
| Whipping Takes Forever | The butter and oil mixture isn't cold enough. | Put the bowl back in the fridge for another 15-20 minutes until it's firm to the touch. |
Don't be discouraged by these minor setbacks! Every batch is a learning experience that gets you closer to creating your signature body butter.
How to Properly Store Your Homemade Creation
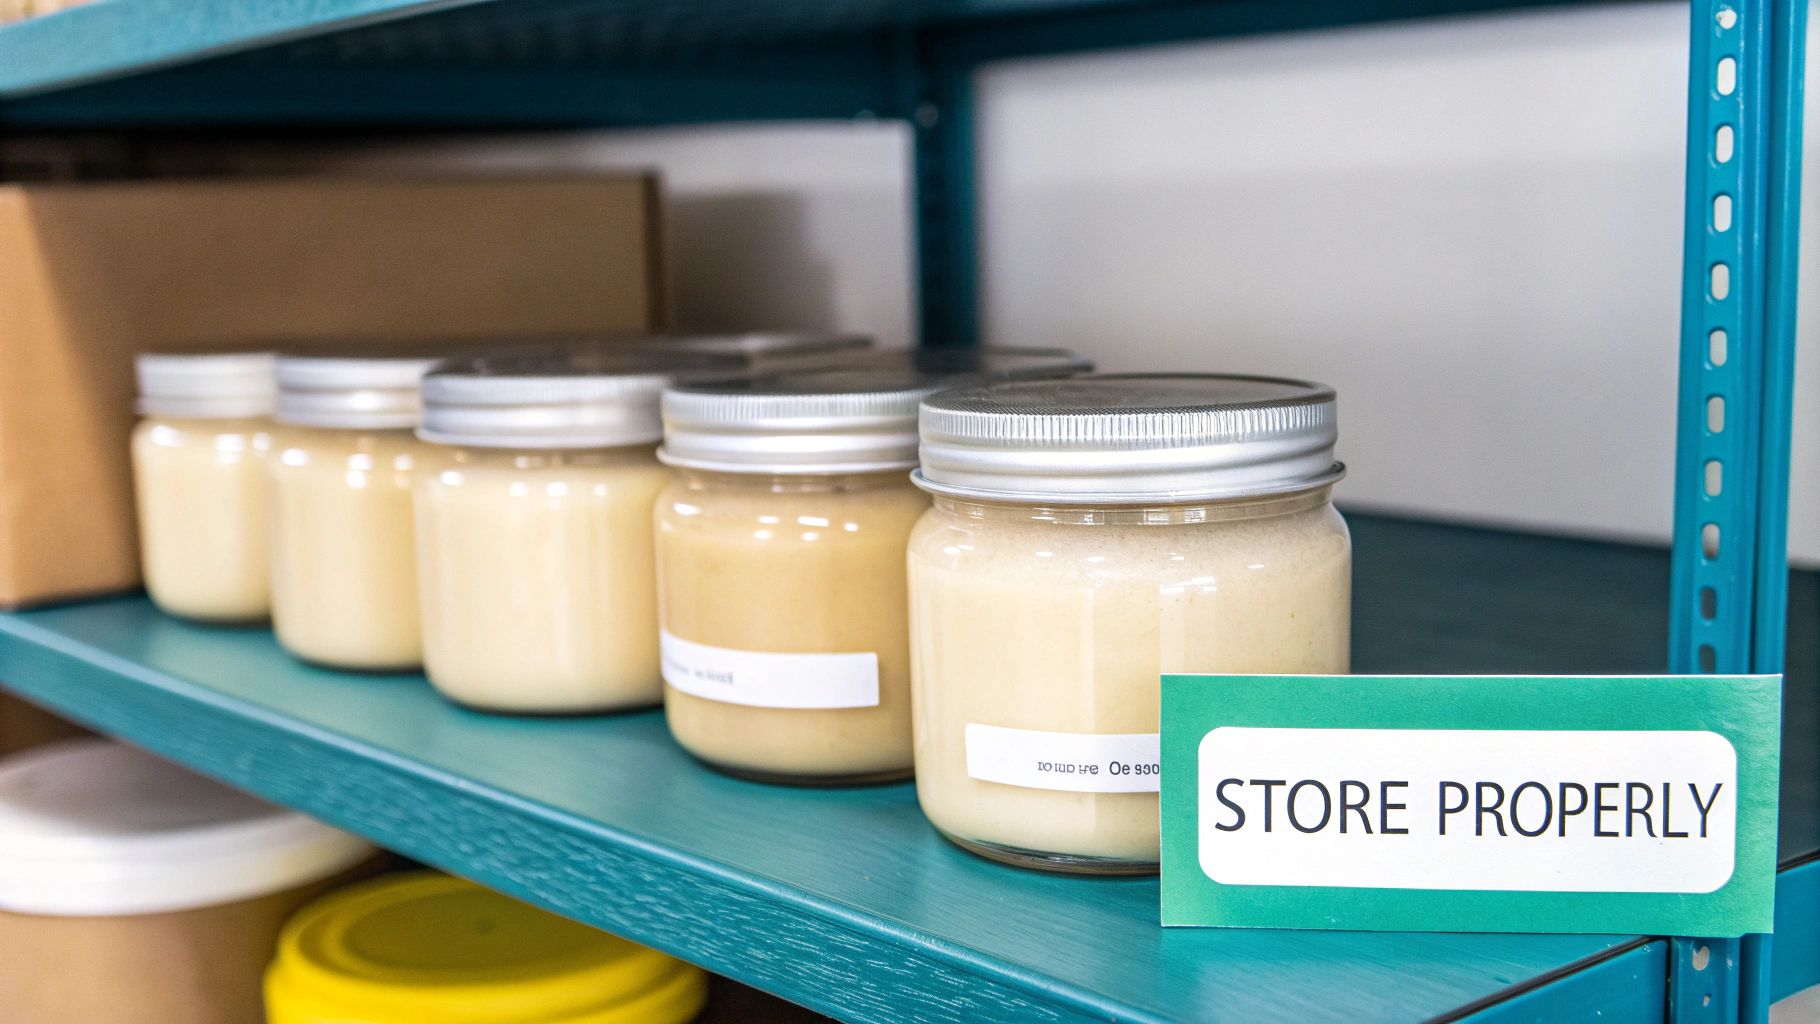
You did it! You’ve whipped up a beautiful jar of luxurious body butter. Now, let's talk about how to protect that masterpiece. Storing your creation correctly is just as important as making it, ensuring it stays fresh, potent, and safe to use for as long as possible.
Your first step actually happens before you even scoop the finished butter into its container. You absolutely must use jars and utensils that have been meticulously cleaned and sterilized. This is non-negotiable! It’s a simple but crucial step that prevents nasty microbes from spoiling your hard work.
Choosing the Right Containers
Think of your storage jar as your body butter’s first line of defense. The biggest enemies of your anhydrous (water-free) formula are light, air, and heat. Exposure to these elements can cause the delicate butters and oils to oxidize and go rancid way too soon.
To give your body butter the longest, happiest life, follow these best practices:
- Airtight Lids are a Must: A snug-fitting lid is key to keeping oxygen out. Oxygen degrades the butters and oils, shortening their shelf life.
- Go for Dark or Opaque Jars: Dark amber or cobalt blue glass jars are fantastic choices. If you only have clear jars, just make sure to store them in a dark cabinet, far away from direct sunlight.
- Keep It Cool: Find a cool, dry spot for your body butter. A bathroom cabinet can work, but avoid leaving it on a sunny windowsill or right next to a steamy shower where temperatures fluctuate.
Shelf Life and the Role of Preservatives
For a simple, water-free body butter, the shelf life is dictated by the single ingredient with the shortest expiration date. Go through your oils and butters, check their individual dates, and use the earliest one as your guide. This typically gives you a window of about 6 to 12 months.
A common mistake I see is people thinking Vitamin E is a preservative. While Vitamin E is an amazing antioxidant that significantly slows down oil rancidity, it does not stop the growth of mold, yeast, or bacteria.
This brings us to a critical safety point. If there is any chance that water could get into your body butter—like scooping it out with wet hands—you absolutely need a broad-spectrum preservative. Water is a breeding ground for microbes, and an antioxidant like Vitamin E is powerless against them.
To get a better handle on this essential topic, you can learn more about choosing the right natural skin care preservative for your formulas. Proper preservation is the secret to making a product that is not only beautiful but safe to enjoy over time.
Your Body Butter Questions, Answered
Once you start making your own body butter, you'll find it's a journey filled with little discoveries and "aha!" moments. It's totally natural to have questions pop up along the way. Here are some of the most common ones we hear, with quick, clear answers to help you perfect your craft.
The first thing almost everyone asks is about shelf life. For a simple, water-free (anhydrous) body butter, the clock is set by whichever ingredient in your recipe expires first. A good rule of thumb? You can expect your creation to last anywhere from 6 to 12 months if you store it correctly.
How Can I Make My Body Butter Less Greasy?
That heavy, greasy feeling is a super common hiccup, but thankfully, it's an easy fix. My favorite trick is to add a small amount of a cosmetic starch, like arrowroot powder or tapioca starch, right into your melted oils before you start the cooling process.
Start with about one teaspoon per cup of oils. This one simple step works wonders to absorb that excess oiliness, leaving your skin with a velvety, almost powdery finish.
You can also tackle it from a formulation angle. Try swapping in some lighter, faster-absorbing liquid oils. Things like grapeseed or jojoba oil can dramatically lighten the final texture without compromising on moisture.
Key Takeaway: The difference between a greasy body butter and a silky one often comes down to a single ingredient. Don't hesitate to play around with cosmetic starches to get that perfect, non-greasy feel you're looking for.
Why Did My Whipped Butter Deflate?
It’s so disappointing when your beautiful, fluffy butter falls flat a day or two later. This usually points to one of two things: the mixture wasn't quite cold enough, or you didn't whip it long enough.
To get that stable, airy texture, you have to whip the chilled mixture until it forms very stiff peaks—think along the lines of making a meringue. If you notice it starting to soften up while you're whipping, just pop the whole bowl back into the fridge for about 15 minutes, then get back to it. This little trick ensures the butter's structure is solid enough to hold all that air you've worked so hard to incorporate.
Ready to dive in and get creative? Skin Perfection has a complete lineup of high-quality butters, oils, and performance actives to help you craft your dream body butter. Check out our premium DIY lotion-making supplies and bring your perfect formula to life.